In System Browser, select Project > ManagementSystem > Servers > MainServer > Drivers > Adaptive Display Driver.
Click the Driver Editor tab.
(Optional) In the Driver Settings expander, modify the description.
In the Configuration Properties expander, proceed as follows:
In the Device Request Timeout field, enter 20000. (Default value is10000 ms).
In the Check Status Rate field, enter 180000. (Default value is30000 ms).
In the Notification Integration expander, proceed as follows:
In the Batch Size field,set the value as 300 (default is 100).Batch size specifies the size in which the request is processed by the driver. The batch size displays the number of devices to which Notification interacts in one instant. For example, if there are 100 devices on which a message has to be displayed and a batch size of 10 is entered, Notification will send the message to batches of 10 devices each.
In the Expecteddeliverytime field, enter the time in seconds. (Default is 5 seconds). NOTE:Notification does not guarantee the message delivery will be completed within the time entered in the ExpecteddeliveryTime field. This value is solely used to compute delivery statistics indicating whether message delivery to the Adaptive device was on-time or late.
Click Save.
The parameters are configured for the Adaptive Display Driver.
The Object Configurator tab displays in the Primary pane.
Click New and select New Adaptive Perle Field Network.
In the New object dialog box that displays, proceed as follows: a. Enter a unique name and description. b. Click OK.
The Adaptive Perle Field Network node is created in the fieldnetworks hierarchy and selected by default.
The Adaptive Display driver is automatically associated to the field network. In the Network Editor tab, under the Network Settings expander, you can see that the values are preselected, and the driver is already assigned.
Select the Projects > Field Networks > Adaptive Perle Field Network.
In the Network Editor tab, click Create.
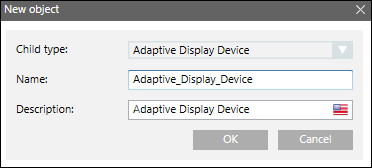
In the New object dialog box, enter a name and description.
Click OK.
The Device Editor tab displays.
In the Device Settings expander, enter a description for the device.
In the Configuration Properties expander, proceed as follows: a. In the Serial Port Number field, enter the virtual COM port number created by the TruePort driver to communicate with the Perle device. A prefix of COM should be used, such that the final value appears as COM102. NOTE: To check the COM ports that were used by the device, open the TruePort Management Tool. b. From Device Mode drop-down list, select Operational. NOTE: The Device Mode can also be changed from the Extended Operation tab.
Select Projects > Field Networks > Adaptive Perle Field Network > Adaptive Perle Device.
Select the Device Editor tab and click Create.
In the New object dialog box, enter a name and description.
Click OK.
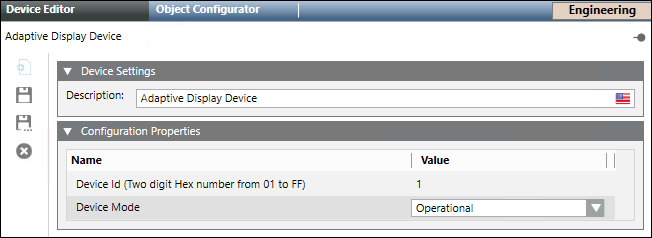
In the Device Settings expander, enter a description for the device.
Open the Configuration Properties expander.
In the Device ID field, enter the ID number of the Adaptive LED display. NOTE: By default, Adaptive LED displays are configured with a sign address ID of 1. If multiple Adaptive LED displays are connected to a single Perle device, each Adaptive LED display must be configured with a different address ID. A maximum of 99 Adaptive Display devices can be configured under a single Perle device.
From Device Mode drop-down list, select Operational so that the driver processes the messaging command and the device configuration change command, and performs status checks for the device. You can also select: - Disabled: In this mode, the driver does not process the messaging command, or the device configuration change command, and can perform status checks for the device. The device remains in a disconnected state. - Administrative: In this mode, the driver processes the device configuration change command and performs status checks for the device. The device will be in a Disconnected/Connected state based on the connection state.
Click Save.
The Adaptive Display Device is created and configured.
 and select New Adaptive Display Driver.
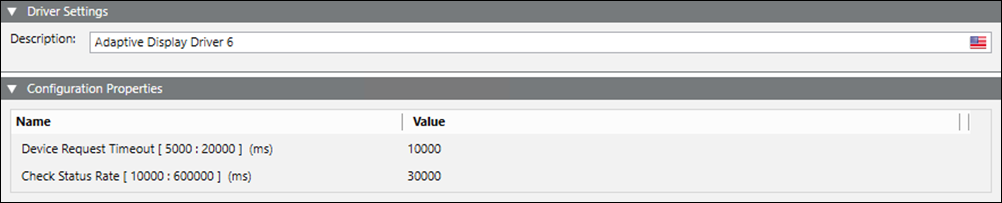

 .
. and select New Adaptive Perle Field Network.
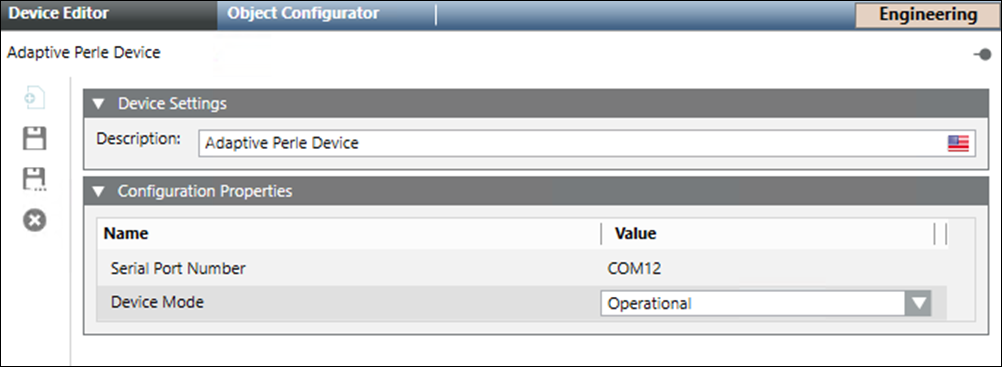
 .
.