BACnet Driver
In this section, topics are included to help you add, start, and configure a BACnet driver among other tasks.
Complete the following procedures as needed:
- System Manager is in Engineering mode.
- In System Browser, select Management View.
- Depending on where the BACnet Driver is required (Desigo CC server or FEP station), select one of the following:
- Project > Management System > Servers > Main Server > Drivers
- Project > Management System > FEPs > [FEP station] > Drivers
- Object Configurator displays in the Primary pane.
- In the Object Configurator tab, click New
 , and select New BACnet Driver.
- In the New object dialog box, enter the Description.
- Click OK.
- The BACnet Driver object appears in System Browser but is not running.
- Click the BACnet tab (which finishes configuring the BACnet driver).
- Click the Extended Operation tab.
- In the Manager Status property row, click Start.
- The BACnet driver starts and is now ready to use.
- System Manager is in Engineering mode.
- In System Browser, select Management View.
- Depending on where the BACnet Driver is located (Desigo CC server or FEP station), select one of the following:
- Project > Management System > Servers > Main Server > Drivers > [name of driver]
- Project > Management System > FEPs > [FEP station] > Drivers > [name of driver]
- Click the BACnet tab.
- Expand Settings.
- In the Management Station section, enter the Instance Number. The Instance Number is the BACnet Device Identifier to assign to the driver as a BACnet client (default is 9998).
- In the Management station name field, accept the default name or enter a new name.
- In the Default alarm class field, click the drop-down arrow and select an alarm class to be used for status messages for this driver.
- In the Max APDU length field, accept the default message size of 1476 bytes or click the drop-down arrow and select a smaller size if the network requires it.
- Default process IDs of 0 and 600 are provided. Consult vendors you are integrating with to obtain their process IDs. To add a vendor ID, enter the number in the blank field, and then click Add.
- In the Acting as Supervised Fire Client expander, check Enable if you have a fire panel that supports client supervision, and then enter the corresponding number in the Client Number field.
- Click Save
 .
.
Related Topics
For overview topics, see BACnet Driver.
BACnet/SC is compatible with the following operating systems and editions:
- Microsoft Windows 10 64-bit (Professional and Enterprise)
- Microsoft Windows Server 2016 64-bit (Build 1709 and later) (Not supported in Desigo CC V6.x)
- Microsoft Windows Server 2019 64-bit
- Microsoft Windows Server 2022 64-bit
If you try to import the .pfx file in Windows Server 2016 Build 1607, for example, an invalid password error displays.
Complete the following procedures only if you want to configure BT BACnet Stack using the BACnet Secure Connect (BACnet/SC) Protocol.
BACnet/SC uses certificates to encrypt your BACnet data during transmission over the network. Two certificates comprise the SC configuration. One is the Certificate Authority (CA or root) certificate provided to you from ABT or a third-party vendor. The other certificate is the host (operational) certificate for Desigo CC signed by the CA certificate. The operational certificate is needed to make Desigo CC a part of the encrypted BACnet/SC system.
For Siemens Devices with ABT
ABT can be installed on the computer running Desigo CC or it can be installed on another computer.
For Third-Party Devices
Different vendors will have their own procedures for creating and importing certificates if Desigo CC is going to connect to a vendor’s SC hub.
After you generate a .csr file, give it to the third party. They must provide a signed certificate and the CA (root) certificate.
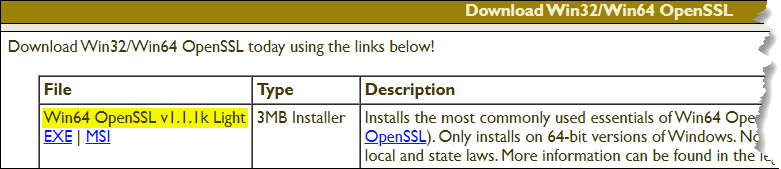
Download Win64 OpenSSL
- Install the Win64 version of OpenSSL (1.1.1, or later): https://slproweb.com/products/Win32OpenSSL.html
Generate Certificate Signing Request
- On your management station, run the Command Prompt as an administrator, go to the installed OpenSSL directory, C:\program files\OpenSSL-win64\bin, and enter the following command:
openssl req –new –newkey rsa:2048 –nodes –keyout server.key –out server.csrNOTE: The server.key must be kept private.
When prompted, complete the fields for your certificate. Do not enter a challenge password. Provide a Common Name such as MyBACnetSCCert.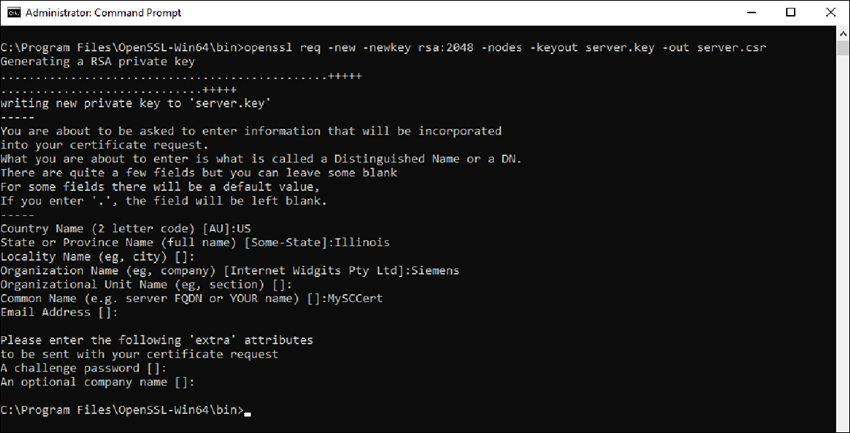
- A server.csr file is created, which you can use in ABT or provide to a third party to sign.
- Sign the certificate in ABT. (As a CA, ABT signs the public key by its private key and provides a host certificate in .cer format.) Copy the generated .cer file to your OpenSSL directory.
NOTE: Third-party vendors can skip this step.
- To form a chain of trust, in ABT click Export root certificate to get a root certificate of the CA.
NOTE: Third-party vendors can skip this step.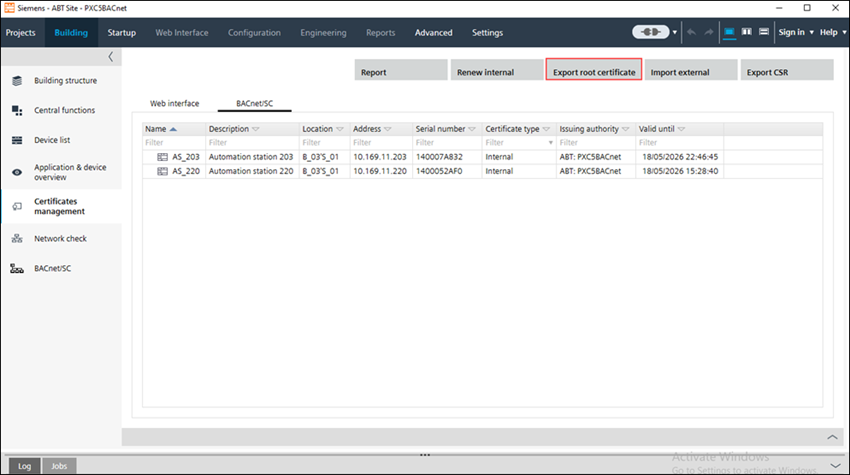
- A [project name].crt file is created and copied to your OpenSSL directory.
- For both ABT and third-party vendors, at the Command Prompt on the Desigo CC computer, go to the OpenSSL directory, and enter the following command to generate a .pfx file from the .cer and .key.
openssl pkcs12 –export –in server.cer –inkey server.key –out server.pfx
Import Certificates for BACnet/SC on the Desigo CC Computer
- In Windows Search, enter manage computer certificates (not manage user certificates), and run the application.
The Microsoft Management Console Certificates dialog box displays.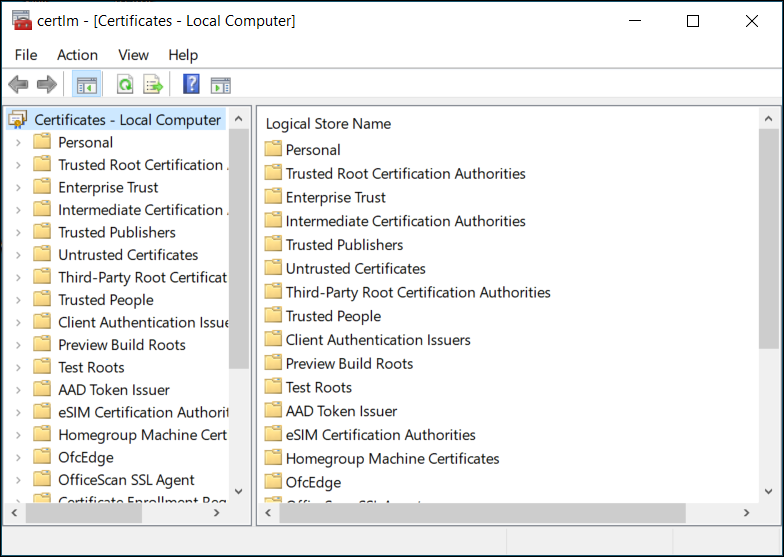
- In the Certificates tree, right-click Trusted Root Certification Authorities, and select All Tasks > Import.
The Welcome to the Certificate Import Wizard dialog box displays.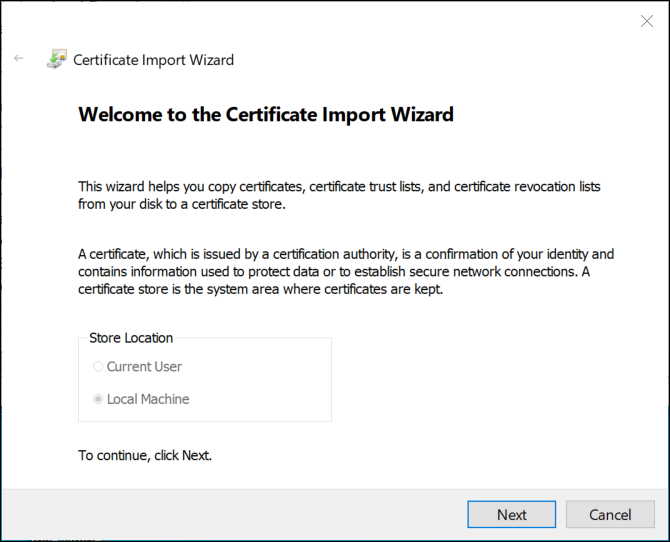
- Click Next.
The File to Import dialog box displays.
- Click Browse, select the root (CA) .crt certificate from ABT or the third-party vendor, click Open, and then click Next.
The Certificate Store dialog displays.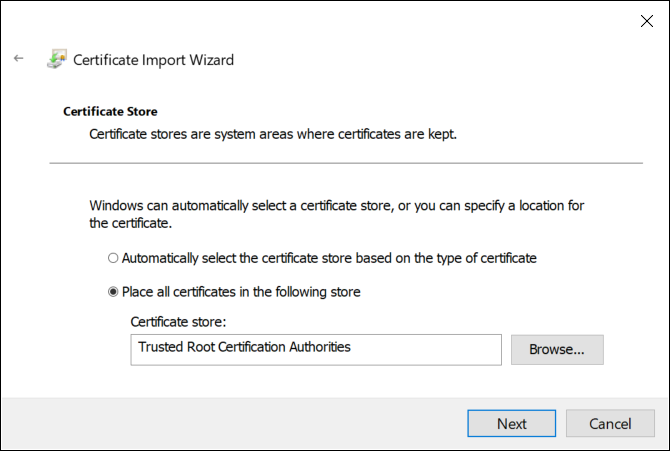
- Accept the default store location, and click Next.
- Click Finish, and then click OK.
- In the Certificates tree, right-click Personal, and select All Tasks > Import.
The Welcome to the Certificate Import Wizard dialog box displays.
- Click Next.
The File to Import dialog box displays.
- Click Browse, and select a host certificate (file type pfx).

- Click Open, and then click Next.
The Private Key Protection dialog displays.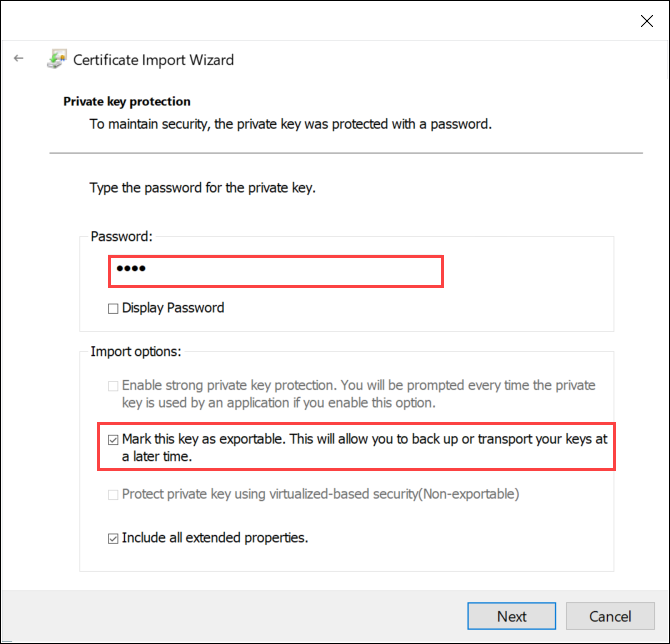
- If there is a password for this certificate, enter it. Select Mark this key as exportable, and then click Next.
NOTE: Do not enable strong private key protection. If your security policy automatically enables it, you must modify the Windows service that runs the Desigo CC services to run in a user account with Administrative rights or privileges.
- In the Certificate Store dialog box, accept the default store, and then click Next.
- Click Finish, and then click OK.
- The two certificates you imported are ready to be used when you configure the BT BACnet Stack.
- In the OpenSSL directory, delete or secure the server.key.
- System Manager is in Engineering mode.
- A BACnet driver has been added and started.
- If using the BACnet/SC protocol, you have imported certificates into the Windows Certificate Store.
- In System Browser, select Management View.
- Depending on where the BACnet Driver is located (Desigo CC server or FEP station), select one of the following:
- Project > Management System > Servers > Main Server > Drivers
- Project > Management System > FEPs > [FEP station] > Drivers
- Click the BACnet tab.
- Open the BT BACnet Stack Config expander.
- In the BT BACnet Stack Gateway Port Table section, click Add and then select one of the following:
- BACnet/IPv4
- BACnet/IPv6
- BACnet/SC
- Ethernet
NOTE: You can create a maximum of 30 physical connections. If you need more, contact Technical Support.
- In the Port Properties expander, set the Network Number where your management station is connected (typically =1).
- Leave the Attached check box selected if you want the router port attached and accessible to other devices on the BACnet network.
- In the Adapter drop-down list, select the hardware adapter this driver will be using.
- Accept the default IP address and UDP Port settings.
- If you selected BACnet/SC in Step 5, configure the SC Hub Connector:
Add a Primary URI using the format wss://<IP address or machine name>:<port number>.
NOTE: Third-party vendors must configure the Primary and Failover URIs using third-party tools. Siemens devices use ABT for the URIs, as shown in the following image: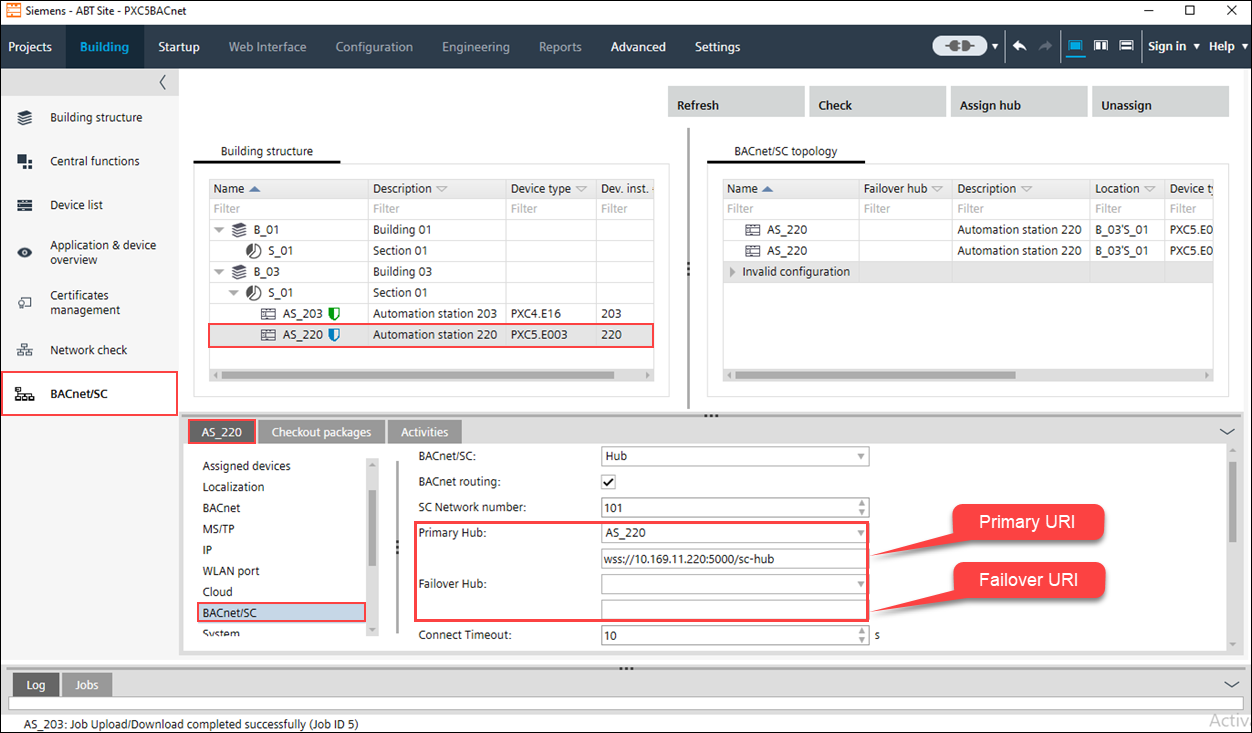
- (Optional) Add a Failover URI in case the Primary URI cannot communicate.
NOTE: The Primary and Failover URIs must be different.
- (Optional) Select the Allow Self Signed Certificates checkbox if you created your own certificate.
- Click Browse next to the CA Certificate field, and select a certificate from the list.
- Click Browse next to the Operational Certificate field, and select a certificate from the list.
- In the Password field, enter the password created for the private key.
- (Optional) To add a Virtual Port, click Add and then select Virtual.
- (Optional) Configure the Physical Port as BBMD or Foreign Device.
- Click Save .
- You have contacted Technical Support and have been instructed to change one or more settings for threads.
- System Manager is in Engineering mode.
- In System Browser, select Management View.
- Depending on where the BACnet Driver is located (Desigo CC server or FEP station), select one of the following:
- Project > Management System > Servers > Main Server > Drivers > [name of driver]
- Project > Management System > FEPs > [FEP station] > Drivers > [name of driver]
- Click the BACnet tab.
- Expand Threads and modify the default values according to information from Threads, and from instructions from Technical Support:
- Polling threads
- Pinging threads
- Alarm threads
- Backup threads
- Trend threads
- Request threads
- Click Save .
- System Manager is in Engineering mode.
- In System Browser, select Management View.
- Depending on where the BACnet Driver is located (Desigo CC server or FEP station), select one of the following:
- Project > Management System > Servers > Main Server > Drivers > [name of driver]
- Project > Management System > FEPs > [FEP station] > Drivers > [name of driver]
- Click the BACnet tab.
- Expand Driver Devices.
- To hide BACnet devices in System Browser and elsewhere in the system, and to prevent auto discovery from re-adding hidden devices to a BACnet network, select the Is a Cloaked Device check box that corresponds to the devices you want to hide.
- Click Save .
- A confirmation message box asks if you want to hide the selected item.
- Click Yes.
- System Manager is in Engineering mode.
- In System Browser, select Management View.
- Depending on where the BACnet Driver is located (Desigo CC server or FEP station), select one of the following:
- Project > Management System > Servers > Main Server > Drivers > [name of driver]
- Project > Management System > FEPs > [FEP station] > Drivers > [name of driver]
- Click the BACnet tab.
- Expand Time Synchronization.
- To synchronize time between devices and the management station, configure the following:
- Time sync interval. Set the panel synchronization delay in minutes. Default is 1440 (24 hours).
- Align intervals. Select the check box to start the periodic time synchronization on the hour.
- Interval offset (minutes). Use the arrows to indicate the amount of time between the time sync interval and the actual time sync.
- Click Save .
- You have already deleted the BACnet network linked to this BACnet Driver.
- System Manager is in Engineering mode.
- In System Browser, select Management View.
- Depending on the location of the BACnet driver you want to delete, select one of the following:
- Project > Management System > Servers > Main Server > Drivers
- Project > Management System > FEPs > [FEP station] > Drivers
- Select the BACnet Driver you want to delete.
- Select the BACnet tab.
- Click Delete
 .
.
- A confirmation message box asks if you want to delete the selected item.
- Click Yes to confirm the operation.
- The object is removed from System Browser.
Related Topics
Deleting a BACnet Network