Encrypting Video Communication Flows

This section provides an overview of how to encrypt the communication flows between Desigo CC. and the Milestone / Siveillance VMS.

NOTE: In addition to configuring encryption as described here, to fully secure the video installation it is recommended to use Active Directory for the VideoApiService account user. For more information see Create VideoApiService Account in Windows.
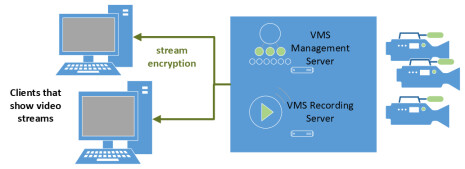
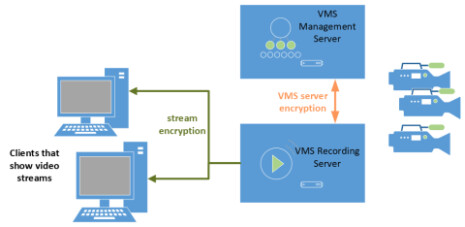
Prepare Certificates for Encryption

Create root CA certificate and SSL Host Certificates

VMS encryption requires a root CA certificate, and an SSL host certificate for each server in the VMS system. You can generate the necessary certificates, for example, using SMC.

  1. Create a root CA certificate:
    This will be used to sign the SSL certificates for the recording server and management server.
  • Enter a descriptive name for the subject name. For example, VMS_Root.
  • Note down the password you specify for this root certificate.
  • At the end of the process you should have two certificate files saved on disk: [root_CA_filename].cer and [root_CA_filename].pfx.
  1. Create SSL host certificate issued to the VMS management server:
  • As the root certificate to use, select the [root_CA_filename].pfx created in step 1, and enter its password.
  • The subject name must be the full host name of the management server computer.
  • Also note down the password you specify for this SSL certificate.
  • At the end of the process you should have two certificate files saved on disk: [SSL_management_server].cer and [SSL_management_server].pfx
  1. Create SSL host certificate issued to the recording server:
  • As the root certificate to use, select the [root_CA_filename].pfx created in step 1, and enter its password.
  • The subject name must be the full host name of the recording server computer.
  • Also note down the password you specify for this SSL certificate.
  • At the end of the process you should have two certificate files saved on disk: [SSL_recording_server].cer and [SSL_recording_server].pfx
    If there is more than one recording server, repeat this step to create an SSL certificate for each one.


Install SSL Host Certificates on Servers

On each server in the VMS system, you must install the corresponding SSL host certificate into the Local Machine > Personal store.

  1. On the VMS management server computer:
    a. In Windows, right-click the certificate file [SSL_management_server].pfx and select Install Pfx.
    b. In the Certificate Import Wizard, select to install the certificate in the store of the Local Machine and click Next.
    c. Confirm the certificate file name and enter its password at the prompt.
    d. Select to place the certificate in the Personal store.
  1. On the VMS recording server computer:
  • Proceed as in step 1 to install [SSL_recording_server].pfx into the Local Machine > Personal store.
    If there is more than one recording server, repeat this step to install the SSL certificate on each one.


Grant Read Permission to Recording Server Service User

On each VMS recording server computer, the recording server service user must be granted read permission to the private key of the SSL certificate.

  1. Start Microsoft Management Console (MMC) and add the Certificates snap-in, setting it to manage certificates for the Computer account on the Local computer.
  1. In the tree select Personal > Certificates to display the certificates in the center pane.
  1. Right-click the previously installed SSL host certificate and select All Tasks > Manage Private Keys.
  1. Select the recording server user and select the Allow check box for Read.
  1. Click OK.


Install Root CA Certificates

If video stream encryption is enabled, the root CA certificate must be installed on each of the Desigo CC client stations, and on all the Milestone/Siveillance clients that stream data from the recording server.

If two-way VMS management-server encryption is enabled, the root CA certificate must be installed on the VMS management server computer, and on each VMS recording server.

  • For each computer, install the root CA as follows:
    a. Copy the [root_CA_filename].cer file to the computer.
    b. Right-click on the certificate file and select Install Certificate.
    c. In the Certificate Import Wizard, select to install the certificate in the store of the Local Machine and click Next.
    d. Select Place all certificates in the following store.
    e. Click Browse... , select Trusted Root Certification Authorities, and click OK.
    f. Click Finish.
  • You can verify that the root certificate is imported in the Microsoft Management Console (MMC): Add the Certificates snap-in, setting it to manage certificates for the Computer account on the Local computer. The certificate should be listed in center view of the Trusted Root Certification Authorities subtree.


Encrypt the Video Streams

These steps let you encrypt the video streams between the VMS recording server and the Desigo CC client stations.
NOTE: When you encrypt the video streams, video images will no longer be visible on any client where the root CA certificate is not installed.

Certificate Requirements for Stream Encryption

To support video stream encryption, each client station that streams video needs to trust the SSL certificate of the VMS recording server. The certificate requirements are:

  • On the recording server computer, Server SSL certificate imported into the Local Machine > Personal store.
    This certificate must be issued to the recording server host name, and the service account that runs the recording server must have access to its private key.
  • On each client that streams video, the root CA certificate that was used to issue the above SSL certificate, imported into the Local Machine > Trusted Root Certification Authorities store.


Enable Video Stream Encryption

Using the prepared certificates, you can enable encryption of all data streams from the recording server.

  1. On the VMS recording server computer, start the Server Configurator tool.
  1. Select the Encryption page.
  1. Under Streaming media certificate, set Encryption to On.
  1. From the drop-down list, select the SSL certificate ([SSL_recording_server].pfx) of the recording server, prepared as instructed above.
  1. Select Apply.
  • Video streams are now encrypted, and will be visible only on computers where you install the CA certificate that signed the selected SSL certificate.


Encrypt VMS Management Server Connections

On the VMS side, you can encrypt the two-way connection between the VMS management server and the VMS recording servers.

Certificate Requirements for VMS Management Server Encryption

To encrypt the two-way connection between the VMS management server and the VMS recording server, each side must have an SSL certificate trusted by the other:

  • On the VMS management server computer:
    • Server SSL certificate --issued to the management server host name--imported into the Local Machine > Personal store.
    • Root CA certificate that was used to create its own SSL certificate, imported into the Local Machine > Trusted Root Certification Authorities Store.
    • (If different) Root CA certificate that was used to create the recording server's SSL certificate, imported into the Local Machine > Trusted Root Certification Authorities Store.
  • On the VMS recording server computer:
    • Server SSL certificate --issued to the recording server host name-- imported into the Local Machine > Personal store.
    • Root CA certificate that was used to create the management server's SSL certificate, imported into the Local Machine > Trusted Root Certification Authorities Store.


Enable Two-Way VMS Management Server Encryption

Once the necessary certificates are ready, you can enable the encryption. You must enable it first on the VMS management server, and then on the VMS recording server.

  1. On the VMS management server computer, start the Server Configurator tool.
  1. Select the Encryption page.
  1. Under Server Certificate, set Encryption to On.
  1. From the drop-down list, select the SSL certificate ([SSL_management_server].pfx) issued to the VMS management server, prepared as instructed above.
  1. Click Apply.
  • Now that encryption is enabled on the VMS management server side, you must enable it on the VMS recording server as well.
  1. On the VMS recording server computer, open the Server Configurator and repeat steps 2 to 5 above, only this time selecting the SSL certificate issued to the recording server ([SSL_recording_server].pfx).
  • Now the two-way communication is encrypted.