Modifying BACnet Fire 3rd Party Alarm Table
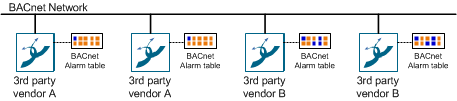
When integrating BACnet 3rd party devices into Desigo CC, you must check that the standard BACnet Fire alarm table is compliant with the alarm priorities of the applicable vendor, and adjust them, if required. You must apply the changes to each device.


Check the Notification Class

In order to ensure a correct display on the Summary bar, the notification class must be properly set in the field network. Do this check for each individual data point as well as on the notification class (NC) object.

BACnetFireStandard_NC Alarm Table

Alarm class

Event state

Alarm priority

Fault

Fault (1)

n/a

Life Safety

n/a

0‒31

Imminent Danger

n/a

32‒63

Fault

n/a

64-95

Fault

n/a

96-127

Anomaly

n/a

128‒191

Information

n/a

192‒255


NOTICE

Some field networks automatically calculate the notification class from the alarm function and alarm class. In this case, you cannot edit the notification class on the alarm object. Change the alarm function or alarm class to get another notification class.


(Optional) Create a New Alarm Table
  1. Select Project > System Settings > Libraries > L1 Headquarters > Fire > Device.
  1. Select the desired field network.
  1. Select the Library Configurator tab.
  1. Click Customize .
  • A confirmation message is displayed.
  1. Click OK.
  • Empty folders are created on the corresponding level.
  1. Select Project > System Settings > Libraries > L1 Headquarters > Fire > Device [field network type].
  1. Select the desired alarm table.
  1. Click Save As .
  1. In the Save Object As dialog box, do the following:
    a. Select a destination folder for the new alarm table.
    b. Enter a name and description.
    c. Click OK.
  • The new alarm table is available in System Browser.
  1. Edit the alarm table as needed.
  1. Click Save .


(Optional) Assign a New Alarm Table

To assign a new alarm table to a property of a device (and to the corresponding property of the child data points that are set to apply the default alarm table), proceed as follows.

  1. Select Project > Field Networks > [network name] > [device].
  1. In the Object Configurator tab, open the Properties expander.
  1. Select the Alarm.OffNormal property or another alarm property.
  1. In the Alarm Configuration expander, select the Valid check box.
  • The check mark changes from blue (defined in the object model) to gray (defined at instance level).
  1. Select the Field System option and then the corresponding Alarm Table from the drop-down list.
  1. (Optional) Repeat the assignment of a new alarm table for all the required devices.
  1. You can assign the new alarm table to other types of data points as necessary. In a similar way, to assign the alarm table also to all data points of the same type, do the following:
    a. Double-click the Object Model label to access the object model node.
    b. Select the Models & Functions tab.
    c. Assign the new alarm table to the Alarm.OffNormal property of the object model.


Example of Alarm Table Configuration

The example displays how an alarm is configured in Desigo CC to display the corresponding event on the Summary bar. In particular, the configuration of the Alarm.OffNormal property is based on the BACnetFireStandard_NC alarm table. This is linked on the device object and used as default by all the other objects, with the exception of the LifeSafetyPoint (LSP) and LifeSafetyZone (LSZ) objects that are based on the BACnetFireDevice alarm table.

Alarm Table Standard Configuration

Object

Alarm Setting

Object models1)

Default

Device

Alarm table

1)

LSP and LSZ object models are based on the BACnetFireDevice alarm table.


Field Alarm Response in Desigo CC