Live Announcement Editor Tab
The Live Announcement Editor tab is available only for MNS license users.
In the System Browser, when you select Applications > Notification > Notification Templates, the Live Announcement Editor tab displays allowing you to configure live announcements using the following expanders along with the toolbar controls listed below:

NOTE:
The Save As  , Delete
  , Import, Export functions are disabled for Web and Windows App clients.
Toolbar | ||
Icon | Name | Description |
| Save | Saves the live announcement template. |
| Save As | Saves the live announcement template under a new name with the settings. NOTE: The Save As feature is disabled for Web and Windows App client. |
| Delete | Deletes the selected live announcement template. NOTE: The Delete feature is disabled for Web and Windows App client. |
| Import | Imports a live announcement template. |
| Export | Exports a live announcement template. |


Displays the general settings of a live announcement template.
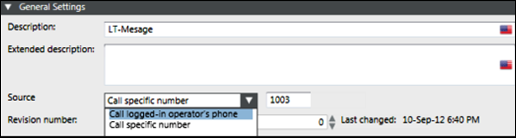
- Description: Contains the name of the live announcement template entered at the time of new template creation. Optionally, an engineer can change this name.
- Extended Description: Type in any additional information about the live announcement apart from the Description. For example, any specific instructions.
- Source: Displays the telephone numbers which can be dialed for the callback. The engineer can choose from the two options available. One is the call logged-in operators’ phone and the other is call specific number.
NOTE: Some upstream PBXs do not interpret a leading “+” in a telephone number correctly. If the system does not reach phone numbers with a leading “+”, leave out the leading “+” or replace the “+” with the respective international phone number prefix (for example, 001 in the US, 0049 in Germany). - Revision Number: Select the revision number for the live announcement template.
- Last Changed: Displays the date and time of the last change in the live announcement template.
Displays Priority of a live announcement template.
The Control Options expander in the Live Announcement Editor tab is as shown in the following image:
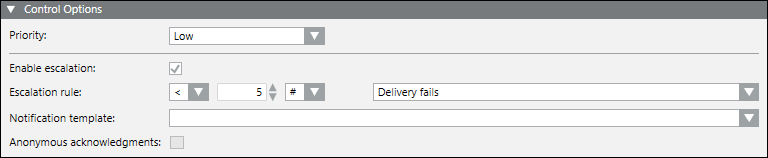
- Priority: Defines the priority of the live announcement template when launched. There are five priority categories: Low, Below Normal, Normal, Above Normal, and High.
- Enable escalation: Select the check box to enable escalation configuration.
- Escalation rule: Allows you to:
- Select the operator like less than <, greater than >, and so on from the drop-down list.
- Enter the value.
- Select the percentage % or exact value indicator # from the drop-down list.
- Select the condition for escalation, for example, Delivery fails from the drop-down list.
For example, if you want to escalate a message if the message delivery fails for more than five recipient users: - The operator to be selected for the above case must be greater than >.
- The value to be selected must be 5.
- The exact value indicator # must be selected from the drop-down list.
- The condition to be selected must be Delivery fails.
- Notification template: For live announcement templates that are part of an incident template, allows users to choose a targeted notification template from the drop-down list. Alternatively, users can drag a stand-alone notification template from the System Browser hierarchy to configure the targeted notification template.
NOTE: Notification templates cannot be dragged for escalation in Web and Windows App clients. For Web and Windows App clients, users need to select a targeted notification template from the drop-down list.
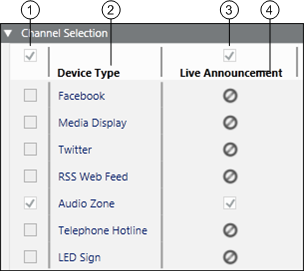
The Channel Selection expander allows you to select a subset of delivery methods and device types for sending a live announcement.
| Name | Description |
1 | NA | Allows you to select/de-select all the Device Types. |
2 | Device Type | Displays the configured device types. |
3 | NA | Allows you to select / clear all the Device Types that support live announcements. |
4 | Live announcement | Displays whether the corresponding device supports live announcements. A check box is displayed if the device is capable of live announcements. |
The Recipients expander in the Message Editor or Live Announcement Editor tab is as shown in the following image:

| Name | Description |
1 | NA | Displays the list of the recipients added to the message template or live announcement template. |
2 | Type | Displays the icons of the recipient type for the available recipients. |
3 | Link to incident by reference(Available only for MNS license users) | When the check box is checked then recipients of notification template are associated to its incident template by reference. Any changes made in recipients of notification template is reflected in all its associated incident templates. If the check box is unchecked, then any changes in recipient of notification template are not reflected in its associated incident template. Link to incident template check box is editable only when message template does not have recipients, or it is not associated with any incident templates. By default, this check box is checked for new projects. |
4 | Filter recipients | Filters the recipients as per their categories (for example, Users, Devices, Locations, and Groups) |
5 | Name | Indicates the name of the recipient. |
6 | Mandatory | Select this check box to make the recipient a mandatory recipient of the message or live announcement that cannot be unselected during a message or live announcement launch. |
7 | Search | Search for a particular recipient from the list of added recipients for the message or live announcement. |
8 | State(Available only for Reno Plus and MNS license users) | Displays the state of the recipient. Following is the list of all the recipient states:
|
9 | Contact List | Toggle between the contact list and configured recipients. |
10 | Search | Search for a particular recipient from the list of available recipients. |
11 | NA | Displays the list of the available recipients. |
12 | Remove | Removes a recipient from the message template or live announcement template. |
13 | Add | Adds a recipient to the message template or live announcement template. |