Creating and Configuring Desktop Notification Server
Scenario: You want to configure Desktop Notification Server.
Reference: For background information, see the reference section.
Workflow diagram:
Prerequisites:
- Alertus Software is installed.
- System Manager is in Engineering mode.
- System Browser is in Management View.
Steps:
- Depending on where to add the Desktop Notification driver, select one of the following:
- Project > Management System > Servers > Main Server > Drivers
- Project > Management System > FEPs > [FEP Station] > Drivers
- In the Object Configurator tab, click New
 and select New Desktop Notification Driver.
a. In the New object dialog box, enter a unique name and description.
b. Click OK.
- The Desktop Notification driver displays in the System Browser below the Drivers node and is selected.
- In the Operation tab, navigate to the Driver Status property and click Start.
- The Desktop Notification driver is created and started.
- In System Browser, select Desktop Notification driver.
- Click the Driver Editor tab.
- (Optional) In the Driver Settings expander, modify the description.
- In the Configuration Properties expander, proceed as follows.

- In the Device Request Timeout field, enter 20000.
- In the Device Request Timeout field, enter 20000 (value in milliseconds).
- In the Check Status Rate field, enter 300000 (value in milliseconds).
- Click the Notification Integration expander.
- Set the Batch Size to a value of 10000 (default is 100). Batch size specifies the size in which the request is processed by the driver. The batch size displays the number of devices to which Notification interacts in one instant. For example, if there are 100 devices on which a message has to be displayed and a batch size of 10 is entered, Notification will send the message to batches of 10 devices each.
- Enter a value into the Expected delivery time field (default is 10 seconds). NOTE: Notification does not guarantee the message delivery will be completed within the time entered in the Expected delivery Time field. This value is solely used to compute delivery statistics indicating whether message delivery to the Desktop Notification server was on-time or late.
On-Time or Late displays are based on the time taken for Notification to deliver the message to the Desktop Notification server and not the time taken to deliver the message to the actual recipient.
- Click Save
 .
.
- The parameters are configured for the Desktop Notification driver.
- Select Project > Field Networks.
- The Object Configurator tab displays in the Primary pane.
- Click New Object
 and select New Desktop Notification Server Field Network.
- Enter a name and description.
- Click OK.
- The Desktop Notification Server field network appears in the field networks hierarchy.
- The Desktop Notification driver is automatically associated to the field network. In the Network Editor tab, under the Network Settings expander, you can see that the values are preselected, and the driver is already assigned.
- Select Desktop Notification Server Field Network.
- In the Network Editor tab, click Create
 .
.
- In the New object dialog box, enter a description.
- Click OK.
- The Device Editor tab displays.
- Open the Device Settings expander.
- A description for the device displays automatically. However, you can change the description.
- Open the Configuration Properties expander.
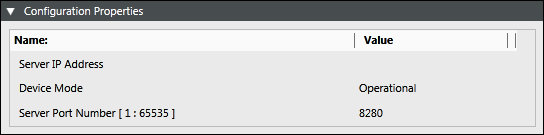
- In the Server IP Address field, enter the name of the server or IP address where the Desktop Notification Server is installed.
- From the Device Mode drop-down list, select Operational.
NOTE: The following options are available in the Device Mode drop-down list:
a) Disabled: In this mode, the driver does not process the messaging command and / or the device configuration change command, but will perform status checks for the device. The device remains inDisconnectedstate.
b) Operational: In this mode, the driver processes the messaging command, the device configuration change command, and performs status checks for the device. The device will be inDisconnectedorConnectedstate.
c) Administrative: In this mode, the driver processes the device configuration change command and performs status checks for the device. The device will be inDisconnectedorConnectedstate.
NOTE: One Desktop Notification Server field network supports only one Desktop Notification Server device. You cannot configure more than one Desktop Notification Server device for one Desktop Notification Server field network.
- In the Server Port Number field, enter the port number to access the middleware of the server. Set this value to 8280.
- Click Save
 .
.
- The Desktop Notification device is created.
- The user device type is automatically configured. In the Recipient Editor tab, under the User Device Types expander, you can see that the Desktop Notification Driver is set as the handling driver and modality is set as Desktop Notification.
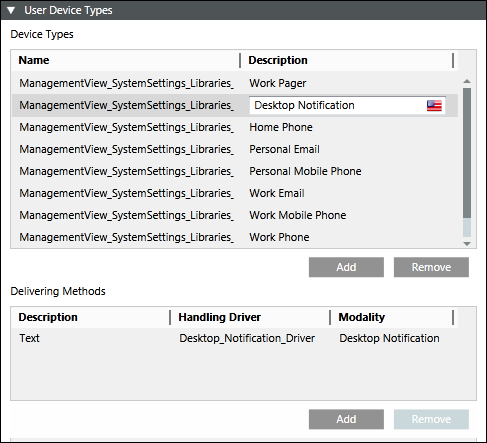
- Add one or more users as recipient user devices into Notification.
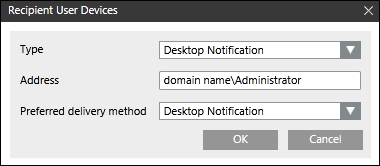
- In the Recipient User Devices dialog box, do the following:
a. From the Type drop-down list, select Desktop Notification.
b. In the Address field, configure the address using User-ID, Device-ID or Group-ID.(See Configure Recipients for Desktop Notification).
c. The Preferred delivery method field is automatically populated with Desktop Notification.
d. Click OK.
- Set up a message template and an incident template with these recipients.
- Make sure that the Desktop Notification Client is installed on the corresponding recipients’ desktops.
- Once the incident is initiated, the recipient user in the message template should receive a desktop notification message. The display of the notification depends on the display profile set for notifications.
NOTE: The initiate incident is performed using Command and Reaction.
Notification sends desktop notification messages to users using User-ID or Device-ID or Group-ID as recipient user device address.
- User-ID- The recipient users login name and the associated domain name.
- Device-ID- The recipient computers Device ID assigned by Alertus server.
- Group-ID- ID of group configured on Alertus server, where the recipient computer is member of the group
NOTE: In case of a recipient user configured using User-ID, the recipient can receive desktop notification messages on multiple computers if the recipient’s login is active on multiple computers.
A. User-ID
The table below depicts a possible scenario with three domains and four users.
For this example let us assume the company name used within the full domain name is AbcdXyz and that the full domain name is based on the convention, CompanyName.DomainName.net.
Item | User Name | Domain Name | Full Domain Name | Value to Set in Notification user interface |
1 | User1 | Domain1 | AbcdXyz.Domain1.net | AbcdXyz.Domain1.net\User1 |
2 | User2 | Domain2 | AbcdXyz.Domain2.net | AbcdXyz.Domain2.net\User2 |
3 | User3 | Domain3 | AbcdXyz.Domain3.net | AbcdXyz.Domain3.net\User3 |
4 | User4 | Domain4 | AbcdXyz.Domain4.net | AbcdXyz.Domain4.net\User4 |
The value to be set in Notification user interface should match with what is displayed in the Alertus user interface in the Logged In User column.
To verify, do the following for a few users after the client has been installed on the user machines:
- Login to Alertus WebApp.
- From the Main menu, click Reports.
- From the Reports menu, click View Device Status.
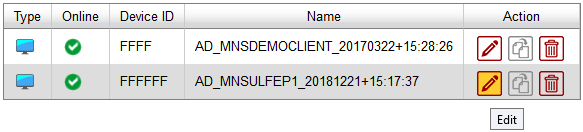
- The View Device Status Report page displays all the connected clients. The image below shows some of the columns of the table that is of use for Notification. The user can scroll to the right to actually see the Logged In User column.

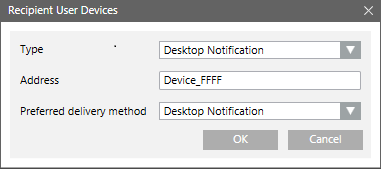
B. Device-ID
In above image (Configuring Recipients for Desktop Notification), the second column shows the device ID of a computer running the Alertus client. When configuring this device ID in the Address field in the Recipient User Devices section, add the prefix “Device_” to the ID. For example, if the device ID is FFFF then configure in address field as Device_FFFF.
C. Group-ID
To create a group on Alertus server and to add a computer (running Alertus client) to a group, do the following:
- Login to Alertus WebApp.
- From the Main menu, click Configure System.
- Click Groups.
- Click Add Group.
- The group ID displays in column 1:

- To add a computer to a group, on the Configure System page, click Alert Beacons & Device.
- Click the Edit button of the desired device
- On the Edit Alert Device page, select the check box of one or more groups that the device is a member of.

- While configuring a group as recipient of a Desktop Notification message, add the prefix “Group_” to the group ID. So if the group ID is 2, in the Recipient User Devices section, configure the address field as Group_2.
NOTE: Configure only one MNS recipient per Alertus client machine. Do not configure multiple MNS recipients for the same Alertus client machine, with User-ID, Device-ID, Group-ID as Address in these different MNS recipients (pointing to the same Alertus client machine).