Creating and Configuring AND IP Speakers
Scenario: You want to configure AND IP Speakers.
Reference: For background information, see the reference section.
Workflow diagram:
Prerequisites:
- AND Device is installed and configured.
- System Manager is in Engineering mode.
- System Browser is in Management View.
Steps:
- Depending on where to add the Single Zone audio driver, select one of the following:
- Project > Management System > Servers > Main Server > Drivers
- Project > Management System > FEPs > [FEP Station] > Drivers
- The Object Configurator tab displays in the Primary pane.
- Click New
 and select New Single Zone Audio Driver.
- In the New object dialog box that displays, do the following:
a. (Optional) Enter a unique description by changing the default.
b. Click OK
- The Single Zone audio driver is added to System Browser.
NOTE: The Single Zone audio driver runs on the main server and does not work with FEP setup installation.
- In the Operation tab navigate to the Driver Status property and click Start.
- The Single Zone audio driver is created and started.
- In the System Browser, select Single Zone Audio Driver and click the Driver Editor tab.
- In the Driver Settings expander, modify the Description, if required
- In the Configuration Properties expander, proceed as follows:
- In the Device Request Timeout field, enter 20000.
- In the Check Status Rate field, enter 90000.
- In the Notification Integration expander, proceed as follows:
- Set the Batch Size field value as 10 (default is 100). Batch size specifies the size in which the request is processed by the driver. The batch size displays the number of devices to which Notification interacts in one instant. For example, if there are 100 devices on which a message has to be displayed and a batch size of 10 is entered, Notification will send the message to batches of 10 devices each.
NOTE: The batch size must be equal to or greater than the total number of the configured single-zone recipient devices.
- Enter the Expected delivery time (default is 5 seconds).
NOTE: Notification does not guarantee that the message delivery will be completed within the time entered here. This value is solely used to compute delivery statistics indicating whether message delivery to the Single Zone audio device was on-time or late.
- Click Save
 .
.
- The parameters are configured for the Single Zone audio driver.
- Select Project > Field Networks.
- The Object Configurator tab displays in the Primary pane.
- Click New
 and select New Single Zone Audio Field Network.
- In the New Object dialog box, enter a name and description.
- Click OK.
- The Single Zone audio field network node appears in the Field Networks hierarchy.
- The Single Zone audio driver is automatically associated to the field network. In the Network Editor tab, under the Network Settings expander, you can see that the values are preselected, and the driver is already assigned.
- Navigate to Project > Field Networks > GSM Gateway Field Network.
- In the Network Editor tab, click Create
 .
.
- In the New object dialog box, enter a name and description.
- Click OK.
- Open the Device Settings expander.
- A description for the device displays automatically. It can be edited.
- Under Device Settings enter a description for the device.
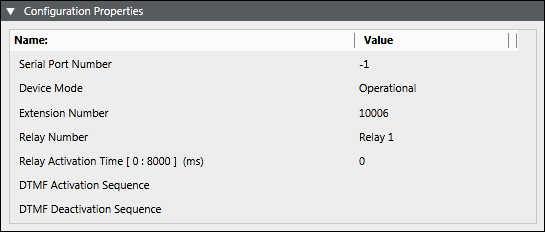
- Open the Configuration Properties expander.
- In the Serial Port Number field, enter the number of Serial COM port created by TruePort for a particular Perle device.
- From the Device Mode drop-down list, select Operational.
- Set the Extension Number to the extension of the AND IP Speaker.
NOTE: For details on creating extensions for the Line Level Audio device, refer to the Telephony Configuration section.
- Set the Relay Number to the relay used for this particular audio interface.
NOTE: It is not necessary to set the relay number when the serial port number is set to -1. For others, the relay number can be set to either 1 or 2.
To use a single audio zone with a Perle device, set the Serial Port Number field to the COM port that was configured for IO access for the Perle device (for example, COM100).
To use a single audio zone without a Perle device, set the Serial Port Number field to -1.
For DTMF devices, a single audio zone is used without a Perle device. In this case, set the Serial Port Number to -1, for a DTMF device.
NOTE: To check the COM ports that were used by the device, open the TruePort Management tool.
- In the Relay Activation Time field, enter the relay activation time.
- In the DTMF Activation Sequence field, for a DTMF device, set the DTMF activation sequence.
NOTE: The configuration of this field is not required for AND IP Speakers.
- In the DTMF Deactivation Sequence field, for a DTMF device, set the DTMF deactivation sequence.
- Click Save
 .
.
To verify that the single zone device is configured correctly, view the connection status of the device under the field network. Additionally, use the Telephony Configuration tool to verify that the audio device has properly registered with the Telephony Server.
To verify the extension status in the Telephony Server, refer to Telephony Device.
Perle Device | SIP Extension | Device Status on UI |
Valid Com Port and Connected | Within the configured Extension range of FreeSwitch and Connected | Connected |
Valid Com Port and Connected | Within the configured Extension range of FreeSwitch and Disconnected | Disconnected |
Valid Com Port and Connected | Not in the configured Extension range of FreeSwitch | Unknown |
Com Port value is -1 | Within the configured Extension range of FreeSwitch and Connected | Connected |
Com Port value is -1 | Within the configured Extension range of FreeSwitch and Disconnected | Disconnected |
Com Port value is -1 | Not in the configured Extension range of FreeSwitch | Unknown |
Valid Com Port and Disconnected | Within the configured Extension range of FreeSwitch and Connected | Disconnected |
Valid Com Port and Disconnected | Within the configured Extension range of FreeSwitch and Disconnected | Disconnected |
Valid Com Port and Disconnected | Not in the configured Extension range of FreeSwitch | Disconnected |