Video Operation Quick Guide
This section provides a quick guide to the main operator workflows of the video application. For related procedures see the step-by-step section.
In the Video folder, you can select a video source object (such as a camera, a camera group, or a sequence) to display corresponding video images in the video view.
When you select a single video source object, images from its camera will display in the first (top left) monitor of the video view.
If you select a camera group or sequence, depending on the system configuration, the corresponding images may take multiple monitors as far as the selected layout can allocate them.
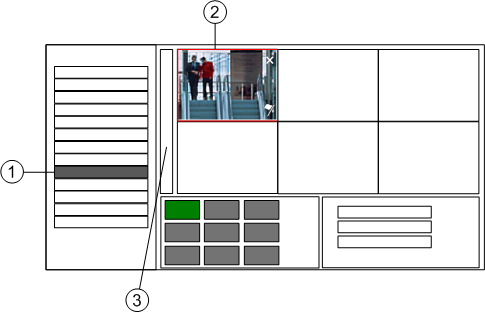
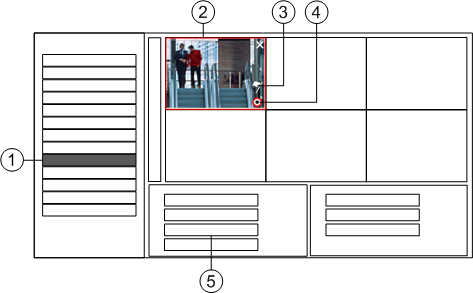
| Screen area | Action / Result |
1 | System Browser | Select a camera, a camera group, or a sequence in the Video folder. |
2 | Primary pane | Video images display in the first (top left) monitor, and possibly in other monitors, of the video view. |
3 | Primary pane toolbar | Select the layout to optimize the video view. |
To display additional video images and further populate your video view, you can drag-and-drop cameras, camera groups, sequences, and other associated objects from System Browser to any of the monitors available. You can also drag-and-drop from a graphic (for example from a camera symbol) or from the textual viewers (for example from the camera description). Groups and sequences will populate as many monitors as their size requires. You can also use a monitor object in System Browser as an indirect video source, and drag-and-drop it onto the monitors of the video view.
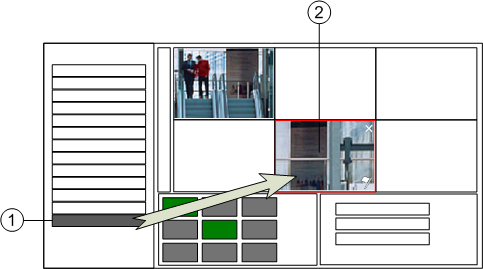
| Screen area | Action / Result |
1 | System Browser | Drag an additional camera. |
2 | Primary pane | Drop it on a monitor of the video view to display video images. |
While analyzing the event list, you can quickly view the live video images associated with an event by dragging and dropping from its event descriptor (specifically from the Source field of a selected event) onto a monitor of the video view. You can also do this from a graphic (for example a camera symbol) and from the textual viewers (from the camera description).
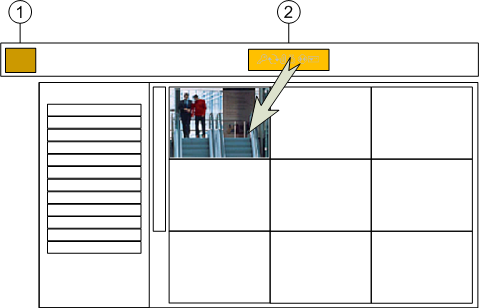
| Screen area | Action / Result |
1 | Event descriptor | Event control button |
2 | Event source |

If the video view layout includes more monitors than those defined in your video view (the monitor group associated to your station), you can drag cameras onto the additional (unassigned) monitors and temporarily view live video images on those monitors. However, be aware that the video display on such unassigned monitors will not be permanent and their camera selection will be lost when you close the video view.
On the other hand, any changes you make to monitors that are part of your video view will be stored and retained by the system. Note that such changes will also affect any other stations that share the same video view or that include the same monitors in their video view.
You can also access video images by selecting a generic object that has associated video sources. For example, a point representing a building zone for fire protection can be associated to the video cameras covering that part of the building (see Cameras Associated to System Objects).
In this case, when you select that zone, you can display the associated video images in the Secondary pane by clicking the camera in the Related Items tab.
The associated camera appears in the first monitor of the video view in the Secondary pane. Additional associations may be based on programmed reactions and can display additional camera images on the other monitors of the video view.
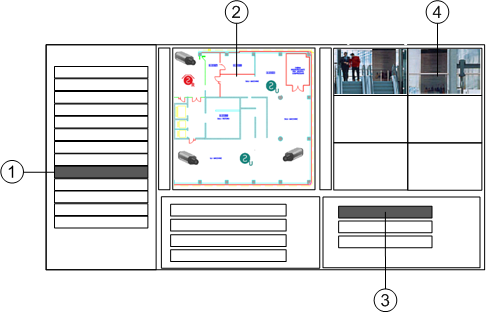
| Screen area | Action / Result |
1 | System Browser | Selection of an object with graphic and camera associations. |
2 | Primary pane | The graphic displays. |
3 | Contextual pane | Selection of the selectable camera association in Related Items. |
4 | Secondary pane | The video view displays. |
Whenever you select any video object or folder, the Related Items tab automatically provides the following links:
- A general Video Display link. Click to open the video view in the Secondary pane. The most recent layout and camera connections are retained.
- Video Archive link. Click to open the video archive in the Secondary pane. From there you can search for and play back video recordings.
- A specific camera link (for camera, camera group, and sequence selections only). Click to open the video view in the Secondary pane, with images from the selected camera in the first monitor. Camera groups and sequences may allocate more monitors.
In addition, whenever you select any system object that has associated video, links to its associated video sources will also display in Related Items.
To manually start a video recording, select the video camera under Applications > Video or directly click the monitor of the video view where the camera images display.
From a selected monitor, you can directly start continuous recording by clicking the Recording
icon  . When recording is in progress, the icon shows a red outer circle and a small “R”:
  . You can click the Manual Tag
  icon at any time to bookmark the current point in the video, to make it easier to find and play back later on.
You can also start / stop video recording, and add tags and annotations, using the commands in the Operation and Extended Operation tabs.
| Screen area | Action / Result |
1 | System Browser | Selection of a camera |
2 | Primary pane | Selection of a monitor |
3, 4 | Primary pane, monitor | Tag icon, Recording icon |
5 | Contextual pane, | Start/Stop/Tag commands |
If configured in the system, automatic video recordings are created and tagged to document alarm occurrences as one of the operating procedure steps of event handling. No manual actions are required to start and stop such recordings, which will be available for replay in the video timeline for as long as defined by the system retention time.
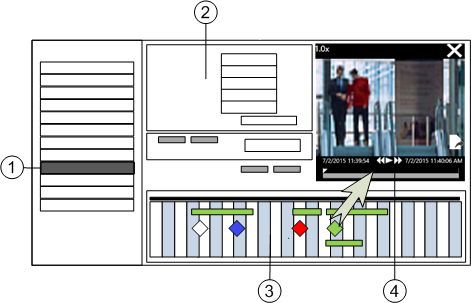
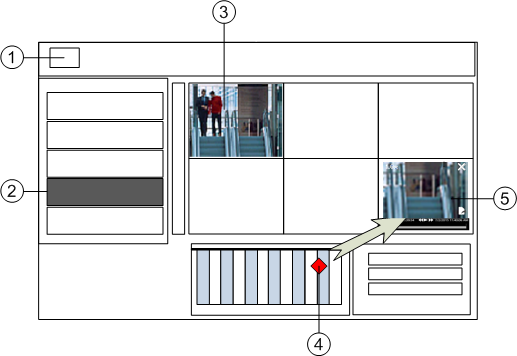
When you select a monitor or a video source object, the Video Controls > Timeline in the Contextual pane lets you access that camera’s recordings of the past 24 hours.
From the camera timeline, you can drag a tag or a video recording symbol onto a video view monitor to display the recorded video. Alternatively, you can use the Playback command, which requires specific parameter settings.
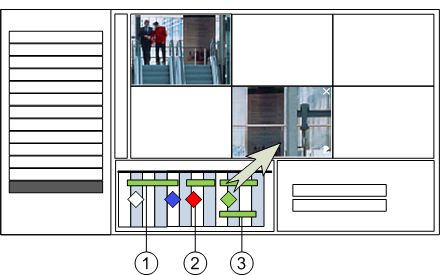
| Screen area | Action / Result |
1 |
| Video recording (a colored line) |
2 | Tag symbol (a colored diamond) | |
3 | Expanded Tag (a colored line) |
NOTE: Unlike the case for live video, if your layout includes more monitors than those defined in your video view, you cannot play back recorded video on the additional, unassigned monitors.
When you select the Video > Archive node, you can search through all the video recordings made from all the video cameras. After you run a search query, the results display in an extended Timeline. From the timeline, you can drag video recordings onto a preview monitor to play them back.
| Screen area | Action / Result |
1 | System Browser | Selection of the Archive node in the Video folder. |
2 | Primary pane - Archive tab - Query section | Definition of the query parameters: cameras, time period, tags and more. |
3 | Primary pane - Archive tab - Timeline section | Video recording search and selection in the Timeline. |
4 | Primary pane - Archive tab - Preview monitor section | Display the recorded video in the preview monitor. |
You can export video recordings into a file in two ways:
- From the Contextual pane, once you have selected a camera, using the command of the Video Clip property, which requires a beginning/end interval setting.
- From the monitor that displays a video recording, clicking the Export icon on the bottom right corner of the monitor.
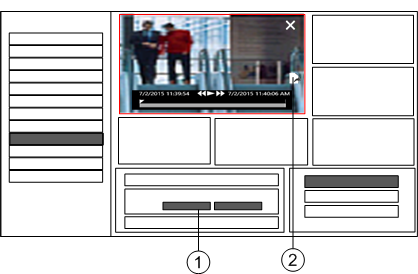
| Screen area | Action / Result |
1 | Contextual pane, | Selection of the Video Clip property node to start a video export (from … to …). |
2 | Primary pane - Archive tab - Preview monitor section | Export icon to start the video export of video images being displayed. |
In Assisted Treatment, a window opens that gives you a step-by-step procedure to follow for handling the alarm. This procedure may include an explicit video step. When you select the video step:
- The video view displays in the Primary pane with live video from the object in alarm in the first monitor.
- The Timeline in the Contextual pane lets you access the video recordings and event tags that document the alarm. You can drag these onto monitors to play back the recordings.
| Screen area | Action / Result |
1 | Event descriptor | Event selected for Assisted Treatment. |
2 | List of procedure steps | Selection of video step. |
3 | Primary pane | The main monitor of the video view displays live video of the camera associated to the object in alarm condition. |
4 | Contextual pane | The Timeline displays the video recording (a green bar) and the event tag (a red diamond icon). |
5 | Replay monitor | Drag the recording bar or the event tag onto a monitor to display the recorded video. |
In Investigative Treatment, a window similar to System Manager opens, automatically focused on the event source, and with the event descriptor along the top. Here you can display live video images just as you would in System Manager. For video objects, the video view displays in the Primary pane. For other types of objects with camera associations, you can display the video view in the Secondary pane by selecting a camera in the Related Items tab.
The live video images of the camera associated to the object in alarm condition automatically display in the first monitor of the video view. In addition, depending on the configuration of the system, further monitors may be used to display alarm-related video images selected via automatic reactions.
To investigate further with video support, you can manually add additional video images in the available monitors by dragging and dropping cameras from graphic (camera symbol) and textual viewers (camera description). You can do this from the Application View of System Browser (Video folder) and from the event descriptor (Source field of a camera event).
In System Browser, you can select a monitor or a monitor group to view its video streams in the Default tab. The corresponding control icons are available in the Monitor Control tab. You can drag-and-drop cameras onto these monitors or control icons in the same way as you drag-and-drop cameras onto the monitors in the video view.
| Screen area | Action / Result |
1 | System Browser | Select a monitor. |
2 | Primary pane | Default tab: Displays the monitor with its video stream. Monitor Control tab: Displays the control icon for this monitor. |
3 | Contextual pane | Displays the control icons of your station’s monitor group. |
Irrespective of the selection you make in System Browser, the Contextual pane continues to display the control icons for your station’s monitor group.
| Screen area | Action / Result |
1 | System Browser | Select a monitor group. |
2 | Primary pane | Default tab: Displays the monitor group with its video streams. Monitor Control tab: Displays the control icons for this monitor group. |
3 | Contextual pane | Displays the control icons of your station’s monitor group. |