Excluding Cameras from the Project
All the video cameras of the connected video management system (VMS)—including the disabled ones—are listed under VMS > Video Devices in the Video Configurator tab. By default, all enabled cameras are imported into the Desigo CC configuration, and so propagate to the System Browser tree, while any disabled ones are excluded.
If required, you can manually select which cameras to exclude or include in the Desigo CC project. Cameras excluded from the configuration in this way continue to operate normally in the VMS, but they are not accessible to Desigo CC clients and are not included in the license count.
Use cases for exclusion include:
- VMS configuration with a large number of cameras that do not all need to be managed from Desigo CC.
- VMS configuration with many permanently disabled/unused cameras (for example owing to cameras represented as multichannel encoders) that you do not want visible in the Desigo CC tree.

Excluding cameras significantly alters the functionality of the video subsystem in Desigo CC. Carefully check the consequences before putting these changes into effect.
Exclusion is used to remove cameras from the configuration on a stable basis. Do not use exclusion for temporary removal of cameras or suppression of events. In that case, you must disable the cameras in the VMS instead.
- Desigo CC is configured to support video surveillance.
- System Manager is in Engineering mode.
- System Browser is in Application View.
- In System Browser, select Applications > Video.
- In the Video Configurator tab, select VMS > Video Devices.
- Open the Video Camera Selection expander.
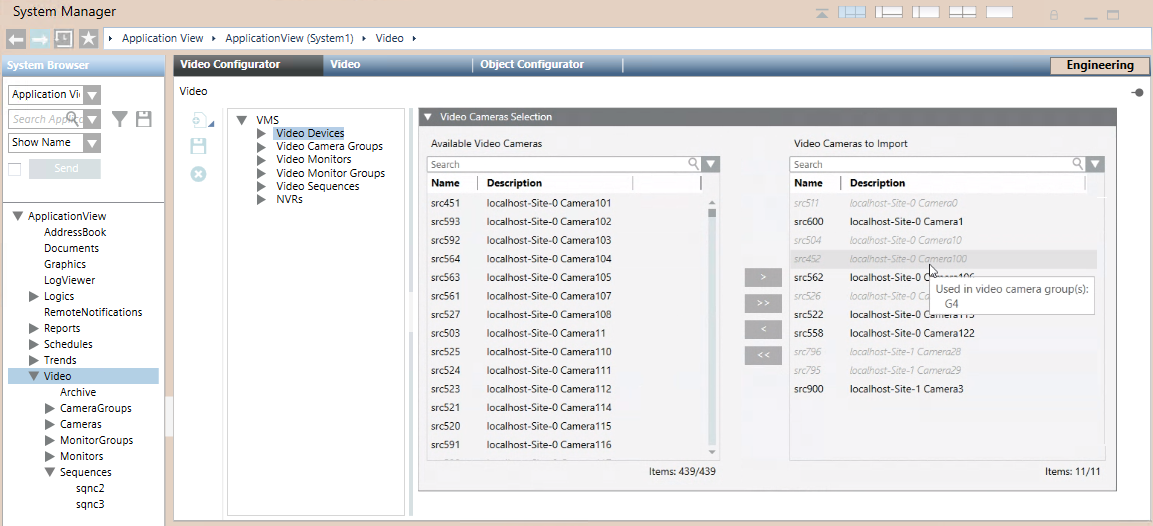
- The Video Cameras to Import list on the right shows the VMS cameras included in the Desigo CC configuration. Any excluded cameras display in the Available Cameras list on the left.
Initially all enabled VMS cameras are included, and so placed on the right. All disabled VMS cameras are excluded, and so placed on the left. - (Optional) For large lists, to help you find a particular camera:
a. in the Search field type a few characters of the description with wildcards (* for any string, or ? for exactly one character).
b. Click Search or press ENTER.
 - Only the cameras that match the search criteria are shown. Underneath each list, Items indicates
number of cameras shown/total number of cameras.
NOTE: Click x to clear the search. To repeat a previous search, select it from the drop-down list. - Move the cameras you want to exclude to the left, and those you want to re-include to the right. The following controls are available:
- Double-click a camera to move it to the opposite list.
- Select one or more cameras and use
 or
or  to move them to the opposite list.
 - Use
 or
or  to move all the cameras currently displayed to the opposite list.
NOTE: Cameras shown dimmed cannot be excluded because they are part of a camera group or sequence. In this case, you must first remove the camera from any groups or sequences that use it. Hover over a camera name to see the groups or sequences where it is used. - Click Save
 .
. - If the Video System was
Disconnected, issue a connect command to align System Browser with the changes.
- The changes propagate to the Cameras folder of System Browser.
NOTE: In case of cameras added or removed, a Sort command may be needed to rearrange them into their correct groups.