Managed Meters Workspace

The Meter Management configuration workspace facilitates creation and configuration of managed meters. You can access this screen by selecting Applications > Energy and Power > Managed Meters. The Meter Management tab is accessible only if you select the Managed Meter application directly from the Security application.

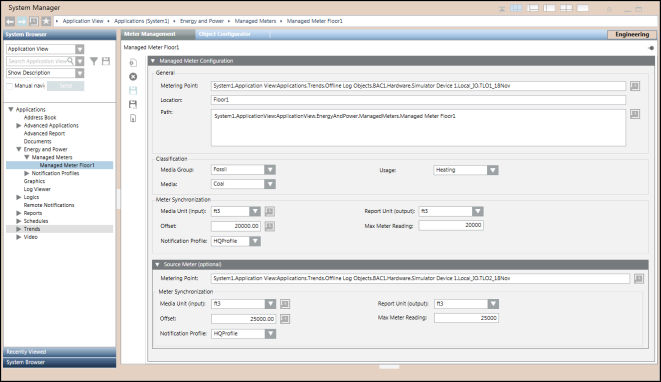
You can configure managed meters from the following options:

Managed Meters Configuration

General

Name

Description

Metering Point

Property of a meter device or an online/offline trend log that collects the property values of the meter device.
NOTE:
This value needs to represent an energy or volume or another accumulation measurement in general, not a rate of change measurement like Power or Flow.

Historize Metering Point

Displays the Historized Metering Point dialog box

Location

Physical location of the meter

Path

Path in the System Browser where the meter is configured

Historize Path

Displays the Historized Meter Path dialog box

Classification

Name

Description

Media Group1)

The media group to which the managed meter is associated. For example, Fossil, Electricity, Water, Heating, Cooling.

Usage1)

Purpose for which the media group and its associated media type is used. For example, heating, power generation and so on.

Media1)

The type of media associated with the media group. For example, for the Fossil group, the media types are oil, gas, and wood chips.

1)

You can modify the values displayed in this drop-down list by editing the respective text group entry. For details, (search for Editing an Entry in a Text List in the Text Group Editor documentation)

Meter Synchronization

Name

Description

Media Unit (Input)

Unit of measurement for the selected media unit for the first meter.

Historize Media Unit

Displays the Historized Media Unit dialog box.

Report Unit (Output)

The required unit of measurement for the selected media unit in a report that contains data from the first meter. This unit can be identical with or different from the unit specified in the Media Unit field.

Offset

Value that must be specified for the first managed meter every time a rollover occurs in order to arrive at the exact meter reading.

Historize Offsets

Displays the Historized Offsets dialog box.

Notification Profile

Notification profile associated with the first managed meter. When you create a new managed meter, the default notification profile is associated with this meter. You can later modify this value.

Max Meter Reading

Maximum meter reading value of the first managed meter.

This is an optional field. If the maximum meter reading is not specified, then the maximum limit of the GMSreal type shall be considered as the maximum meter reading for the purpose of setting the warning limits for a meter rollover.

Source Meter

Source Meter (Optional)

Name

Description

Metering Point

Property of a meter device or an online/offline trend log that collects the property values of the meter device.
NOTE:
This value needs to represent an energy or volume or another accumulation measurement in general, not a rate of change measurement like Power or Flow.

Meter Synchronization

Media Unit (input)

Unit of measurement for the selected media unit for the second meter.

Report Unit (output)

The required unit of measurement for the selected media unit in a report that contains data from the second meter. This unit can be identical to or different from the unit specified in the Media Unit field.

Offset

Value that must be specified to the second managed meter every time after a rollover in order to arrive at the exact meter reading.

Notification Profile

Notification profile associated with the second managed meter.

Max Meter Reading

Maximum meter reading value of the second managed meter.

This is an optional field. If the maximum meter reading is not specified, then the maximum limit of the GMSreal type shall be considered as the maximum meter reading for the purpose of setting the warning limits for a meter rollover.

Managed Meters Toolbar

The Managed Meters toolbar allows you to perform the following operations:


Name

Description

New

Create a new managed meter.

Delete

Delete an existing managed meter

Save

Save a managed meter configuration.

Save As

Save the configuration of the selected managed meter as a new managed meter.

Apply Historization

Historizes the metering point, path, media input, and offset information.

Representing the Managed Meters Layout

You can represent the layout of managed meters in the management station by creating a hierarchy below the user defined views. For information on creating a user defined view having hierarchies of buildings, floors, and managed meters assigned to the floors, see Creating a User-defined View for Managed Meters.

Your hierarchy can be based on the following parameters:

  • Meters distributed across a geographical area, such as country, city, faculty, building, floor, plant and so on. For example, to calculate the energy consumption details for the different floors of a building, you can create a hierarchy that shows the meters installed on each floor of the building.
  • Meters distributed across different occupants in a building, complex and so on. For example, assume there are four companies in one building; one on each floor. You want to know the details of energy and water consumption for each company. In this case, you can create a hierarchy of the main building and the names of the four companies based on different floors, with the energy and water meters installed in each company.
  • Meters distributed on the basis of commercial or business perspective. For example, to monitor the energy consumption details of the different departments in an organization, you can create a hierarchy of the company with the various departments and the meters installed in each department.
  • Meters distributed on the basis of media units such as water, power, gas or oil. In this case, you can create a hierarchy of the various media units and then associate meters to each media unit. For example, you can create a view and add electricity, gas, and water media units to this view. To this structure, you can then assign the meters for monitoring electricity, gas, and water consumption respectively.


Historized Metering Point Dialog Box

This Historized Metering Point dialog box allows you to view the historized information, as well as enter values for the metering point.

Historized Metering Point Dialog Box


Description

Valid From

Date and time from when the object was associated with the meter.

Metering Point Path

Physical path of the object associated with the meter.

Object Identifier

Identifies the object associated with the trend log.

Save

Saves the newly added metering point entry.

Edit

Allows you to edit an existing metering point entry. You can only edit the Valid From field.

Delete

Deletes an existing entry.

Historized Metering Path Dialog Box

The Historized Meter Path dialog box allows you to historize information related to the meter path.

Historized Meter Path Dialog Box


Description

Valid From

Date and time when the meter was created in the view

View Name

View name where the meter is created

Meter Path

Path of the meter in the view

Save

Saves the details of the new path where the meter is linked

Edit

Allows you to edit the value in the Valid From field

Delete

Deletes an existing entry

Mark as Deleted

Adds a strikethrough mark for a meter that is no longer associated with a view

Historized Media Unit Dialog Box

The Historized Media Unit dialog box allows you to historize information related to the media unit.

Historized Media Unit Dialog Box


Description

Valid From

Date and time from when the media unit is associated with the meter.

Media Unit

Media unit associated with the meter.

Save

Saves a new entry for a media unit.

Edit

Allows you to edit an existing entry from the Media Unit and Valid From fields.

Delete

Deletes an existing entry for a media unit.

Historized Offsets Dialog Box

The Historized Offsets dialog box allows you to manually historize the offset value.

Historized Offsets Dialog Box


Description

Valid From

Date and time from when the offset of a managed meter is applicable.

Offset

Updated offset value.

Cumulative Offset

Sum of the offset values.

Save

Saves the new offset value along with the data and time from when it is applicable.

Edit

Allows you to edit the Offset and Valid From fields.

Delete

Deletes an existing offset entry.

Historizing Managed Meters

Historizing managed meters refers to the process of storing the historic managed meter data in an XML file for calculating the energy consumption.

When you create a new managed meter and save the entries, the details of the metering point, path, media unit, and offset are historized by default to January 1, 1753. However, when you modify these values and thereafter save the managed meter, the historization is set to the current date and time.

If a managed meter is created below another meter in the view hierarchy, the new meter will be historized by default to January 1, 1753 and not to the historization date of the parent meter.

You must maintain the historic data to handle the following situations:

  • Meter Replacements – A managed meter associated with a floor or building is replaced due to fault. In order to calculate the exact consumption details for the floor or building, you must historize the information from both these managed meters. In order to represent a logical replacement of meters, the existing metering point is replaced by the new metering point in the Metering Point field. You may also need to change the value of the media unit if the new metering point uses a different unit of measurement. The information that is historized includes the metering point and the media unit. In case of managed meter replacements, the new metering point and it’s unit of measurement will be historized according to the current date and time.
  • Meter Movements – A managed meter that is associated with a particular floor of a building for a certain time period is moved to a different floor. When you save the destination aggregator node, the path of the managed meter is historized according to the current date and time. You will need to manually historize the managed meter to reflect its removal from the source aggregator node.
  • Meter Rollover – A meter rolls over to 0 each time after reaching its maximum value. The last value before rollover needs to be set as the Offset value in the managed meter, thereafter, when you save the managed meter the Offset value is historized to the current date and time.
  • Any change in the managed meter configuration such as replacement of metering point, change in media unit input, managed meter movement, and setting of new offset value will be historized to the current date and time. However, you can change the historized date and time to the required date and time from the respective historization dialog box.