Settings Tab

The Settings tab allows you to configure the output format and destination for a Report Definition.

Report Output Group Box

The Report Output group box displays the configured entries for a Report Definition.

Clicking the Dialog Launcher displays the Report Output Definition dialog box that allows you to configure the report output settings.
The configured report output definitions are executed when the report definition runs automatically.

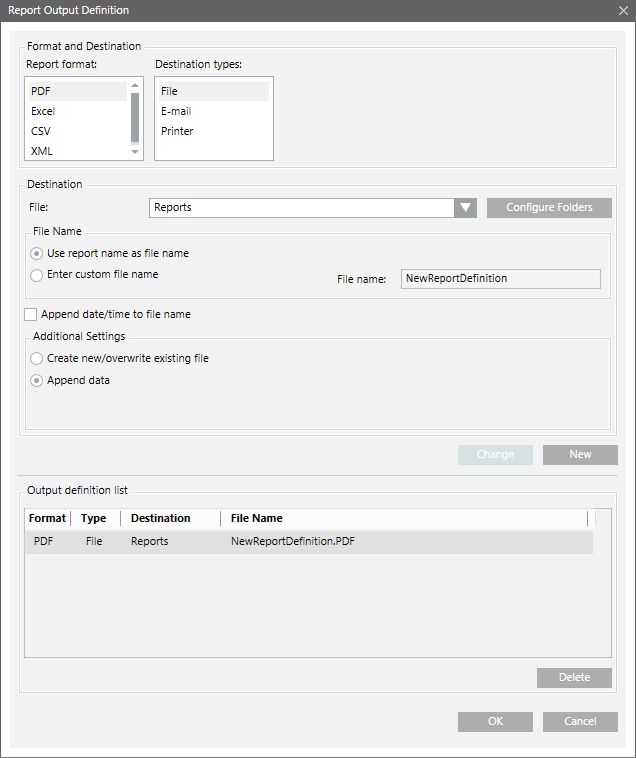
Report Output Definition Dialog Box Components

Field

Description

Report format

Lists the following supported file formats.
PDF
Excel
CSV
XML – This format is available only if you have the relevant license.
NOTE 1: According to the EMC requirement, the CSV report format is supported to export a Trends report in the CSV format. The EMC proxies have plug-ins that support converting data from CVS formats for import into EMC. To have Desigo CC trend data compatible with the EMC trend data import plug-in, the CSV columns (for trends table only) are modified: Date; Data Source; Value (separated by semicolon).
NOTE 2: The CSV does not support logos or plots; also Report header/footer is not present.
NOTE 3: The CSV format applies only to exporting the Trends table.

Destination types

Lists all the various destination types: File, Email and Printer.
The Destination types displayed in the list depend on the type of format selected in Report format.
NOTE: When you select the Destination Type as File or Email, you can specify the name of the file that will be generated upon automatic report execution using either of the following options:

  • Use report name as file name
  • Enter custom file name

Destination

Depending on the Destination types settings, you can configure the destination in one of the following ways:

  • File: Configured folder name displays in the File drop-down list.
  • Email: Email text field is populated with the pre-configured email contacts.
  • Printer: Available printers display in the Printer drop-down list.

Use report name as file name

Default option. Becomes available only when you select the destination type as File or E-mail. In this case, the File Name field is populated with the selected report name and is unavailable.

Enter custom file name

When selected, allows you to type in the desired file name in the File Name text box.

File name

If the file name contains special characters such as, / \ : * ? < > | “, then it is highlighted with a red border and a tool-tip displays the error message.

Append date/time to file name

Becomes available only when you select the destination type as File or Email. When checked, adds the date and time to the file name.

Create new/overwrite existing file

Default option. Allows you to configure a new file to the configured destination when routing reports. If the file does not exist, a new file is created, existing files are overwritten.

Append data

Adds the currently executing report data to the existing file with the same file name and file type present at the destination. If there is no such file, a new file will be created.
NOTE 1: This option only applies to PDFs.
NOTE 2: In case of an existing split PDF document, if the Append data check box is selected, the number of available pages in the previous split document is ignored and, a new split document is created in the same folder with an incremental number.

Change

Allows you to modify an existing Report Output Definition entry.

Add

Adds a Report Output definition entry to the Output Definition list.
NOTE: This button is unavailable if the Destinations drop-down list is empty.

Output Definition List

Displays the existing Report Output Definition entries.

Delete

Deletes the selected Report Output Definition.


PDF Report Format

After executing a Report Definition manually or automatically, you can view and save the report as a PDF document.
A PDF document contains all the report elements of the Report Definition with output data and sorting applied.
It also displays the special formatting applied to Report Definition elements (such as tables, plots, keywords, and so on).
The PDF document can have a maximum of 500 pages, however if the number of pages exceeds 500 the document splits into two.
You can add digital signatures or watermark text on the generated pdf reports using the Adobe Acrobat DC software (not included).

You can either view the PDF document or the split documents in the Report Management section under the Report snapshot when you
generate the report manually or you can locate them in the folder configured in the Report Output Definition dialog box when you generate the report automatically.

Reports do not support TrueType collections for PDF generation.
To generate a PDF document for Asian languages, you must select TrueType fonts which support Asian characters in the Report Definition, for example, Arial Unicode MS.

If the PDF document generated for operating procedure does not display any data, ensure the following:

  • Check the applied filters and make corrections (if required)
  • A graphics containing the object in the event is available


Excel Report Format

After executing a Report Definition manually or automatically, you can view and save the report as an Excel (XLSX) document.
This enables you to perform any calculations (if required) on the Excel document by applying Excel formulas.
You can either view the Excel document in the Report Management section under the Report snapshot when you generate the
report manually or you can locate them in the folder configured in the Report Output Definition dialog box when you generate the report automatically.
If the size of the document exceeds the Excel maximum of 1000 worksheets or 1,048,575 rows, a new Excel file is created for the next set of records.

An Excel document contains all of the reporting elements of the Report Definition with output data and user-defined configuration.
Form Controls in the report definition are not present in the Excel document. Any special formatting applied to the Report Definition elements are not retained in the Excel document.

If you have multiple tables or plots in a report definition, the generated Excel document displays the details of each table or plot in a separate worksheet.
Each worksheet also displays information on other reporting elements such as keywords and logos in the report definition.
Each column in the worksheet has a combo box that corresponds to a table column that enables you to perform analysis on the table data.
In case of an Event Details table the generated Excel document does not have any combo boxes as the data displays parent and child records.
However, if you remove the child columns from the Select Columns dialog box, run the report, and then generate the Excel document,
only the parent records display and the columns display a combo box that enables you to perform data analysis.

In order to perform analysis on a specific set of columns in a table, you can add a PivotTable or chart to the generated Excel document
and set this document as a template to the report definition having this table.
When you run the report and generate the Excel document, information related to the columns you added to the PivotTable or chart displays in a separate worksheet.

The PivotTable or chart in the template must have columns of only those tables that are present in the report definition.
For example, if you have a report definition with an All Logs table, the PivotTable or chart in the Excel document that is set as a template
to this definition must have columns specific to the All Logs table only.

In case of an Event Details table, you must remove all the child columns for the PivotTable to be displayed.

In case of a distributed system, the process of generating the PDF or XLS documents will stop if you switch over to a different system.
During this process, if the document is likely to be split into multiple documents, then the pending documents will not be available.
You can decide whether you want to proceed with the document generation process by confirming to the dialog box options that display when you switch over to a different system.


File Destination Type

Before you save a file at a specific location in your local management station, you must configure the output folder paths in the Report Output Folders Configuration dialog box.
You can launch this dialog box from the Report Output Definition dialog box.

After configuration, you can view and select these output folder paths in the Report Output Definition dialog box.

Report Output Folders Configuration Components

Field

Description

Folder Alias

Displays the name of the destination folder. When you select File in the Destination Type field, this name will be displayed in the File drop-down list of the Destination list of the Report Output Definition dialog box.

Folder Path

Displays the folder path that you have selected using the Browse button. You can configure a maximum of 100 folder paths. An error message displays if the number of folder path exceeds 100.

Browse

Helps you to locate the destination folder. You can also create a new folder at a desired location.
NOTE: If you do not have the required permission on the selected folder, an error message displays.

Folder Description

(Optional) Describes the contents of a folder.

Add

Adds the Folder Alias, Folder Path, and Folder Description in the List of folders for Report Output. This button is unavailable until all the mandatory fields are filled.

List of Folders for Report Output

Displays list of configured output folders. On selecting a configured output folder, the Folder Alias, Folder Path, and Folder Description fields are populated.

Change

Modifies an existing output folder configuration in the list.

Delete

Deletes a selected entry from the list. This button remains unavailable until an output folder is selected in the List of Folders for Report Output. If you try to delete an entry which is used in any other Report Definition, a confirmation message displays.

Clear

Clears all the fields that are populated when you select an output folder entry in the List of Folders for Report Output.

Destination Type - Email

The Report Output Definition dialog box allows you to send a report via email. You can send all documents in one mail or configure the number of documents to be sent per email. The default is one document per email. Before sending an email you must configure the mail server.

The Email Contacts dialog box displays when you select the destination type as Email and then click the Select Contacts button. This dialog box allows you to choose and filter from the list of all recipients having email addresses configured in the Contacts selection list.

Email Contacts Dialog Box Components

Field

Description

Contacts selection

Shows the names of the configured contacts in the Recipients Editor tab of the Notification application followed by their email address in brackets. This list is sorted alphabetically.
NOTE: A recipient may have up to three different email addresses configured.

Filter List Entries

Allows you to type in a filter. For example, if you type the letter “A”, the recipient list displays all the contacts starting with the letter A.

Automatic Update of Configured Email Addresses

The Output Definition list in the Report Output Definition dialog box and Contacts selection list in the Email Contacts dialog box updates automatically, if you change or delete the email address of a particular recipient in Recipients Editor tab of the Notification application.

Action

Result

A recipient email address is changed in the Recipients Editor tab

The new email address reflects in the Output Definition list in the Report Output Definition dialog box and Contacts section list in the Email Contacts dialog box.

A listed email address of the configured contact is deleted in the Recipients Editor tab

The list of email addresses in the Output Definition list in the Report Output Definition dialog box displays in red. On moving your mouse pointer over the text, the following tooltip message displays: One or more email addresses are invalid. Select the correct email address. Report will not be sent to the invalid email addresses. On selecting the report output definition, the email addresses configured in the definition display in the Destination field. The deleted email address displays as Unknown object. In order to remove the unknown object from the list, you must select a valid email address from the Select contacts dialog box.

The report is run by clicking the Execute button in the Extended Operation tab

Report is routed to the valid email addresses configured in the report output definition.

A recipient is deleted from the Recipients Editor tab

The list of email addresses in the Output Definition list in the Report Output Definition dialog box displays in red. On moving your mouse pointer over the text, the following tooltip message displays: One or more email addresses are invalid. Select the correct email address. Report will not be sent to the invalid email addresses. On selecting the report output definition, the email addresses configured in the definition display in the Destination field as Unknown objects.

Listed email address of the configured contact deleted in Recipients Editor tab

Recipient deleted from the Recipients Editor tab

Destination Type – Printer

The Report Output Definition dialog box allows you to send a Report Output Definition to a printer.

You can print all or the first 100 (default) pages. You can edit the default and enter the number of pages to be printed.
Currently only PDF report format is supported for printing.
To print a PDF report format on a printer, you must configure a server printer.

The document to be printed depends on the sorting you applied to the columns of a table.