Obtain and Verify the Software Distribution

This is the very first task that you need to perform in order to install Desigo CC Server Client, FEP.


The software distribution contains the necessary files for installing all components of the Desigo CC system. Once you download the Desigo CC software, you should review the distribution media.

NOTE:
Do not install Desigo CC from a remote location, as it will result in errors, such as path name length restrictions/failure in execution of post-installation steps/some components may fail during installation due to file lock issue if the same remote location is used by multiple machines to install the setup/unexpected behaviors may occur if the installation is expected to resume after a machine restart.
To avoid facing such errors, please install Desigo CC from a local software distribution, or first download the Installer files from a remote location to the local management station.

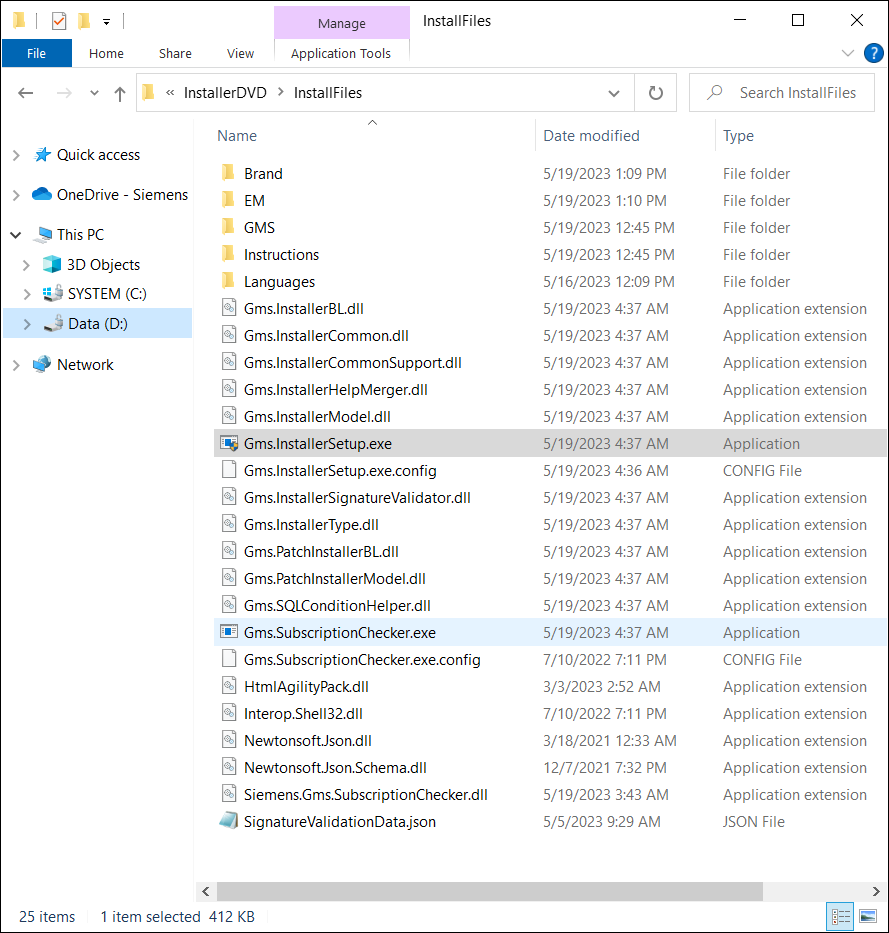
For a new installation, the software distribution must contain the following files and folders along with the other files inside the InstallFiles directory.
The installation media does not include all required third-party software programs and files for operating system service pack upgrades. You can find these files on the manufacturer’s website. This is indicated in the appropriate sections.

Read the following topics as required.

Installation Planning Checklist

Installation planning involves the planning of the customer network and IT environment. Use the following checklist to prepare the Desigo CC installation.

  • For information related to hardware/software requirements, hardware category definitions, IT environment compatibility and so on, refer to the System Description (A6V10415500 ). For information related to hardening guidelines, refer to the Cybersecurity Guidelines ( ).
  • System Dimensioning Guidelines: The size of the field system and the number of clients that can be supported by this configuration depend on the server hardware configuration.
    The System Dimensioning Guide Calculator is available under one of the following links: https://intranet.for.siemens.com/cms/041/en/business/products/Pages/desigocc.aspx
    or: http://www.siemens.com/bt/partner-extranet
    Click Download on the start page and then select Tools and software.
  • Download the Desigo CC software. For more information on how to configure the GMS Platform.txt file for silent/semi-automatic installation, see the Librarian and Distribution document (A6V11643840 ).
  • Make sure that no other installation is in progress when you install/upgrade Desigo CC. Otherwise, the Installer waits until the already running installation is completed.
  • Use the following table to record information you find useful or might need in the future. Some examples are port numbers, computer names, and account names and passwords. Contact Technical Support for the password.

Product Features and Related

Name

Notes

Default features


Signed Brand


Added features (extensions)


Language packs

In addition to the default en-US?

Deployment type

– Standalone Server with or without Web Server (IIS)
– Client/Server
– Server with Remote web Server hosted on Client/FEP

Setup type

– Server with or without Web Server (IIS)
– Client, FEP with or without Web Server (IIS)

Installation mode

– Custom
– Semi-automatic
– Silent

Post-installation for platform and/or extension

Applicable only for Setup type - Server and includes the following post-installation steps:
– License activation (platform)
– Project restore and upgrade (mandatory extension SMC)
– HDB creation (mandatory extension SMC)
– LTS creation (mandatory extension SMC)
– Linking HDB to project (mandatory extension SMC)
– website creation (mandatory extension SMC)
– Web application creation (mandatory extension SMC)
– AddSWInstallation
– TemplateSynchronization
– EM Web application creation, if configured for an EM (extensions, wherever applicable)
– Project activation and startup (mandatory extension SMC)
– Client application startup (mandatory extension SMC)

Project and HDB backup

Valid project and HDB backup should be located at known path (required for upgrade and SMC post-installation step)

  • Collect the User and User domain details:

User Domain and User Accounts

Name

Notes

DefaultAdmin (Default User Name)

Call Technical Support for the password

Root user password


GMSDefaultUser (Closed Mode User)


Process Monitor (Pmon) User Project and HDB Owner

Must have Logon as Service right.
Additionally, it may also have Administrative rights.

SQL admin account (If SQL is already installed)

Note the account that was used for the SQL Server installation.
It is required when doing future changes to the SQL database.

Administrative rights on Server, Client/FEP computer

Windows logged on user on Server, Client/FEP must have administrative rights to be able to work with Installer Wizard, SMC, the Desigo CC Client application.

User domain

– Local
– Workgroup
– Hierarchical domains

Global user

Required only for distributed deployment scenarios

Website/web application user

Required only when configuring websites/web applications for working with Windows App Clients

  • Collect the IT security details, including who provides the certificates and so on.

Server/Client/FEP/Web Server Certificate

Item

Notes

Self-signed

Storage location? Password?

Root


Host


Private key

Algorithm/key strength: RSA, 2048 bit

Windows key file


Host name (Subject name)


  • Collect the IT environment details including who is responsible for the network, IT administration and maintenance.

IT Environment Details

Item

Notes

Server computer name, VM name

Storage location? Password?

Client/FEP computer name


Windows OS type

Ensure that you have installed the required features for the installed version of the Windows operating system.

.Net 4.7.2 and .Net 5.0.13


IIS configuration based on OS Type


MS SQL

Local or remote

Dual stack (IPv4, IPv6)


Firewalls

DMZ, NAT/PAT, VPN?

Virus scanners


Intranet, Extranet, Internet

Supported Web browsers - Microsoft Edge, Internet Explorer 11 onwards, Firefox, Chrome, Safari (for Flex Client only)

Windows updates

Update possibility - Internet access or offline updates using offline tools

License requirement

File-based or dongle

Installation folder


MS Office Version


PDF Viewer

Adobe Reader, PDF-XChange

AutoCAD files


Shared Server project path

Location

Verify the Brand Folder

Verify that you have the required brand and it is signed.

The Brand folder, a mandatory folder, contains brand-specific information for EULA, icons/shortcuts, Help, HTML5 images, entry page, and splash screen image.

The Installer copies this information from the distribution media to a pre-defined location on the target machine so that Installation Wizard, Uninstallation Wizard, Clients applications, the menu names in the Start menu, shortcut on desktop, names in the control panel and help can adapt according to the brand.

NOTE:
Do not to use the following characters in the <ShortName> and <CompanyName> attributes in the Brand Config.xml file. Otherwise, a message displays informing you that your Brand folder is corrupted and the installation is aborted.
- Umlaut ("ä","ö", "ü") - cause problems during online backup
- Dollar sign ($)
- At sign (@)
- Angle brackets (< >), brackets ([ ]), braces ({ }) and round brackets (( ))
- Colon (:) and semicolon (;)
- Equal sign (=)
- Circumflex sign (^)
- Vertical bar (|)
- Asterisk (*)
- Exclamation mark (!)
- Percent sign (%)
- Question mark (?)
- Comma (,)
- Quote sign (single and double) (' ")
- Tabulator blank


Verify the Extensions

Verify that the EM folder contains set of required extensions depending on the subsystems at the customer plant.

An extension allows you to install an additional subsystem on the top of the management station.

The EM folder contains extension modules folders, each with their Languages, Prerequisites, PostInstallation (optional), and ProjTemplates folders (optional), setup file, and EULA, if present.

A mandatory extension is always installed and is not available for selection/deselection during installation. Moreover, its parent extension (mandatory or non-mandatory) is not displayed for selection/deselection and gets installed.

For Semi-automatic and Silent installation, you must specify the extensions that you want to have installed in the GMS Platform.xml file located at ..\InstallerDVD\InstallFiles\Instructions.

To add the extension from other location than the distribution media, you need to configure the path of these extensions in the attribute [ExternalEMsPath] and the EM name must be added in the section [EMs] of the GMS Platform.xml file. Make sure that the parent extensions of the external extensions to be added are either available in the distribution media or at the path provided in the attribute [ExternalEMsPath] of the GMS Platform.xml file. Otherwise, the Installer skips installation of externally added extension if the parent extension of externally added extension is not available/is inconsistent.

The PostInstallation folder, if present, contains the post-installation steps specific to the extension. Ensure that the post-installation steps are valid and enabled (modified the extension from .txt to .xml).

The Installer always installs the extensions according to the brand and the Setup type.


Verify the GMS Folder

Verify that the GMS folder, a mandatory folder, contains the following folders and files:

  • Languages: Contains the mandatory en-US language pack that contains the Resource, Translation, WebAppPages, and WebsitePages folders, where relevant information is stored.
  • PostInstallation: Contains the post-installation steps specific to the platform. Ensure that the post-installation steps are valid and enabled with the extension modified from .txt to .xml. For information on how to enable the [GMS/EM]PostInstallationConfig.xml file, see Verify and Enable a Post-Installation Step for Execution.
  • Prerequisites: Contains both mandatory as well as non-mandatory prerequisites of Desigo CC .
  • EULA and README files: After successful installation you can find some third-party/EMs EULA and README files, for which acceptance is not required to continue with the installation process located at
    [installation drive:]\[installation folder]\GMSMainProject\bin\EULA\ReadMeOSS.
  • GMSConfig.xml file
  • Siemens.GmsPlatform.msi
  • ProjTemplates: This folder may or may not be present. If present, it contains the project templates for the platform. In case of Server installation, the Installer simply copies the contents of this folder to the
    [installation drive:]\[installation folder]\GMSMainProject\ProjTemplates folder on the target machine. If there is an already existing project template in the destination folder, then the Installer skips copying the project template. The Installer copies the project templates only during the first installation and upgrade.
    You may restore the project template using System Management Console. (See Restoring a Project or Creating a Project from a Template).


Review the Installation Prerequisites

Before proceeding with Desigo CC installation, you must verify and install .NET 4.7.2 and 5.0.13 on the operating system. See Install .Net 4.7.2 and 5.0.13 in Complete the Installation Planning Requirements.

While installing Desigo CC, some prerequisites (mandatory and non-mandatory) are also installed, based on the setup type selected.

The computer where you install Desigo CC may already have some of these prerequisites. The Installer detects the earlier or later version of a prerequisite installed on the system. The Installer allows you to resolve the version conflict either by skipping, installing, aborting the installation, or updating to the required version of a prerequisite.

Confirm which software version is installed on a computer with the Programs and Features item in the Windows control panel.

The installation prerequisites can be logically divided into the Mandatory and Non-mandatory prerequisites.

  • Mandatory prerequisites are required; otherwise, Desigo CC will not function. If a mandatory prerequisite fails to install, theDesigo CC Installer aborts the installation process.
  • Non-mandatory prerequisites are those that, if not installed, may cause some Desigo CC functions to not work properly. However, the Desigo CC Installer continues the installation process even if one of the non-mandatory prerequisites fails to install. You are informed of such failures only at the end of the installation. You can manually install the failed non-mandatory prerequisites using the setups available in the
    ...\InstallFiles\GMS\Prerequisites folder of the software distribution.

NOTE:
Desigo CC uses several third-party components which are installed on your computer where security vulnerabilities might be discovered during the lifetime of the system and the manufacturer provides security fixes (refer to the EULA for a full list). You are responsible to keep the system up to date by obtaining and installing the appropriate fixes.


List of Installation Prerequisites

The following table lists all the installation prerequisites for a setup type.

Installation Prerequisites

Prerequisite Name

Mandatory/Non-mandatory

Installation Setup Type(s)

Functionality Lost on Omission of a Non-mandatory Prerequisite

Automation License Manager

Mandatory

  • Server
  • FEP
  • Client


Microsoft Application Request Routing (ARR)

Non-mandatory

  • Server
  • FEP
  • Client

Websites root node in SMC is not available. You cannot work with websites.

License Management Utility (LMU)

Mandatory

  • Server
  • FEP
  • Client


OPC Core Components

Mandatory

  • Server


WinCC OA 3.18

Mandatory

  • Server
  • FEP
  • Client


Microsoft SQL Server 2019, Express Edition

Non-mandatory

  • Server

Cannot create History Database on server.

Microsoft SQL Server 2012 - Native Client

Non-mandatory

  • Server

Cannot find SQL servers from the network locations using the History Database in SMC.

Microsoft SQL Server 2016 - System CLR Types

Non-mandatory

  • Server

Cannot find SQL servers from the network locations using the History Database in SMC.

Microsoft SQL Server 2016 - Management Objects

Non-mandatory

  • Server

Cannot find SQL servers from the network locations.

Visual Studio 2019 Redistributables_x64

Mandatory

  • Server
  • FEP
  • Client


Visual Studio 2019 Redistributables_x86

Mandatory

  • Server
  • FEP
  • Client


NOTE:
Once you install Desigo CC, Microsoft Application Request Routing (ARR) is installed on your system. After successfully installing ARR, you can verify the addition of the following modules in the IIS section when you open the Microsoft Internet Information Services (IIS) Manager and select the root node (machine name node) in the tree on the left pane:
- Application Request Routing
- Output Caching
- URL Rewrite
You can get more information, as well as download the prerequisite Microsoft Application Request Routing, from the link http://www.microsoft.com/en-us/download/details.aspx?id=40813


Microsoft SQL Server

Desigo CC uses the Microsoft SQL database software.

The software distribution, by default includes, SQL Server 2019, Express Edition, which you can install during installation or upgrade.

However, if the system requirements exceed the capacity of Microsoft SQL Express, Microsoft SQL Server regular editions can be used, extending storage capacity and increasing the performances of the history database operations.

There is a 10 GB limit to the SQL Server Express database and of 250 GB for SQL Server. For information on how to estimate the history database size and thereby determine the SQL Server edition, see the System Description (A6V10415500 ).

NOTE:
Make sure that you keep your Windows OS version to the latest updated version. Otherwise, during installation error may appear when installing SQL Server. In that case, you need to update Windows version to the latest and then manually install the required SQL version.

If you do not have Microsoft SQL server installed, it is recommended to install one of the following Microsoft SQL database software on the Desigo CC server:

  • SQL Server 2019, Express Edition
  • SQL Server 2016
  • SQL Server 2017
  • SQL Server 2012 and SQL Server 2014 are no longer supported and may become incompatible in the future. The supported versions include, SQL Server 2016, SQL Server 2017, and SQL Server 2019.

For information on the supported SQL Server versions and corresponding operating systems, see Microsoft Windows help or visit http://support.microsoft.com.

NOTE:
Procuring and installing Microsoft SQL Server regular editions is not part of the Desigo CC software distribution.
The software licensing, administration, and maintenance of Microsoft SQL Server regular editions is the responsibility of the customer.
For instructions on manually installing versions of the SQL server, see Microsoft Windows help or visit http://support.microsoft.com.

If you want to use your own SQL server installation, you can skip the default SQL Server 2019, Express Edition installation during Server installation.

Even if you choose to skip the SQL installation, the three prerequisites, Microsoft SQL Server 2012 - Native Client, Microsoft SQL Server 2016 - System CLR Types, Microsoft SQL Server 2016 - Management Objects are installed on the server in this same order. Installing these prerequisites help in creating the history database remote server using SMC.

If the Microsoft SQL Server is already installed on the computer, use the same account that was used in the initial installation of the SQL Server. Be sure to note the account that was used for the installation. This account (the SQL admin account) is required for future changes to the SQL database. The account used to install the software must have administrative rights on the computer where the server is installed. Otherwise, the SMC cannot create an SQL history database.

To uninstall Microsoft SQL Server, see Uninstall Microsoft SQL Server or Uninstall 3 SQL Prerequisites.

NOTICE
Do not change the name of the server after the SQL Server has been installed.

The Microsoft SQL Server does not support name changes to the computer after the SQL server has been installed. Doing so can adversely affect the operation of the Desigo CC software
Therefore, do not change the name of the computer where the Desigo CC Server and the Microsoft SQL Server are installed!


Verify and Enable the GMS Platform.XML File

The Instructions folder, if present, can contain one or more GMS Platform.txt configuration files, located at the path ..\InstallFiles\Instructions. This file contains the pre-configured installation options for silent or semi-automatic installation.

NOTE:
The instruction file (GMS Platform.txt file) is typically modified by the librarian / distribution manager.
For information on configuring, editing the GMS Platform.txt file for silent/semi-automatic installation contact your local distribution manager.

The Installer only refers to the GMS Platform.xml file during the silent and semi-automatic installation mode when you change the extension from .txt to .xml (GMS Platform.xml) and enable the GMS Platform.xml file. For more information, see Verify and Enable the GMS Platform.XML File.

If the Instructions folder is not available or the GMS Platform.xml file is invalid, the semi-automatic installation does not work. However, the Welcome to the Install Wizard dialog box displays and you can proceed with the installation using the custom installation mode.

Following are some important considerations that you must verify before proceeding with the semi-automatic or silent installation.

  • You must configure the installation options that you want to install in the GMS Platform.xml file, you must specify. This includes the setup type, extensions, installation language, and so on.
    For example, you must modify the default value Server of the tag <SetupType> to Client/FEP install the Setup type - Client/FEP. You can then also rename these files in order to easily identify them with names such as Server.xml, FEP.xml, or FEP_WithoutEMs.xml and so on.
  • Even if multiple valid files for various setup types are present in the Instructions folder, for semi-automatic installation, only the default set up type, Server, is selected by default.
  • Even if you do not configure mandatory extensions and its parent extension (mandatory or non-mandatory) in the GMS Platform.xml file, the Installer ensures that they are installed/upgraded during installation/upgrade.
  • Even if you do not explicitly mention the parent extensions of the extensions that you have configured in the GMS Platform.xml file, the Installer ensures that all parent extension modules of the configured extension modules are installed during the semi-automatic and silent installation.
  • You can also use this file for silently executing the post-installation steps of platform as well as of the extensions. For this, you need to first configure them in the <PostInstallationSteps> section of platform (GMS section) as well as of the extension in (EMs section).
  • Ensure that the post-installation steps for the platform (for example, the post-installation step of License Activation) or for the configured extension (for example, Project Setup for the extension SMC) are configured in the GMS and/or EM section with Execute = True for the configured <Step Name>.
    Note that during the semi-automatic or silent installation only those post-installation steps are listed in the Post-Installation Selection dialog box which you have enabled (changed the extension from .txt to .xml) for execution.
  • In the GMS Platform.xml file, the duplicate entries for some tags are not allowed. If they are found in the GMS Platform.xml file, the file becomes invalid. For a semi-automatic installation, such a file becomes unavailable for selection in the Installation Selection dialog box. For more information see, Consistency Check Scenarios.
  • Incorrect entries in the GMS Platform.xml file can cause installation failures. To determine the cause of a failure, view the installation log file with the extension _SILENT for silent installation and _SEMI for semi-automatic installation, located at the path
    [System drive]:\ProgramData\[company name]\GMS\InstallerFramework\GMS_Installer_Log.

NOTE 1:
Silent installation and semi-automatic installation are only for new installations. Both these installation modes do not support upgrading to Desigo CC.
However, you can install additional extension modules or language packs, or reinstall the failed prerequisites or extension modules. For more information, see Additional Installer Procedures.
NOTE 2:
Installing service releases using the silent or semi-automatic installation (for all setup types - Server, Client and FEP) is only supported for Desigo CC Version 3.0 and later.

Additional Consideration For Silent Installation

  • To provide the valid parameters in the command, you must know the
    • Full path of the file Gms.InstallerSetup.exe
    • Full path of the silent installation XML (GMS Platform.xml) file
  • You can run the GMS Platform.xml file from anywhere on the disk. You can do this when you pass the parameters to the Installer exe through the command line interface: <Installer exe path> /q <instruction file path>
  • Once started, you cannot cancel the silent installation.
  • During silent installation, to handle the restart automatically without the user intervention, change the default value (No) for the attribute <AutoRestart> to Yes.
    For example, before installing the Microsoft SQL Server 2019 - Express Edition, a restart is required. Then in the GMS Platform.xml file, you need to configure the <AutoRestart>Yes</AutoRestart> settings so that the computer is restarted automatically. However, after the restart, you must provide the login details to continue the installation.
  • Refer to the Consistency Check Scenarios for more information on inconsistencies such as
    • Any invalid/inconsistent entries in the GMS Platform.xml file makes the file invalid, eventually aborting the silent installation.
    • Any inconsistencies between the GMS Platform.xml file and the software distribution aborts the silent installation.
    • Any inconsistencies in the EM folder regarding the extension itself or the post-installation steps of extension, skis the installation of that extension or the extension post-installation steps.
  • You can re-start the silent installation to install the additional extensions, language packs or any prerequisite. For this you must make sure that the required extensions and/or language packs are available in the software distribution and configured in the GMS Platform.xml file, and Desigo CC Installed Client and SMC are closed.


Verify the Languages Folder

The Languages folder is located in …\InstallFiles and contains the languages supported by WinCC OA 3.18, as a language pack folder. Each language pack contains the EM and GMS subfolders that, in turn, contain the relevant folders structure.

During installation, use the Language Packs dialog box to select the required language packs to be installed on the selected setup type.

The Installer then copies the selected language packs from the installation media to a pre-defined location on the target machine. You can configure these languages in a project so that the Desigo CC Server and all clients types can adapt its user interface according to the selected language pack.

NOTE: For UL and ULC applications, verify that the language selected in Desigo CC is the same as the language selected on the Fire Alarm panels connected to it.

Desigo CC software is delivered in English and can be extended with three additional languages. Following software language packages are available.

List of Supported Languages

Arabic

Japanese

Chinese (simplified)

Korean

Chinese (traditional)

Norwegian

Czech

Polish

Danish

Portuguese

Dutch

Romanian

English

Russian

Finnish

Slovak

French

Slovenian

German

Spanish

Hebrew

Swedish

Hungarian

Turkish

Italian


Verify and Enable a Post-Installation Step for Execution

Do the following procedure to verify and enable the post-installation steps such as License Activation, Project Setup and the post-installation steps of other extensions.

  • You have configured the post-installation steps in the appropriate sections (GMS and/or EM) of the GMS Platform.xml file and have verified and enabled the GMS Platform.xml file.
    For example, for the post-installation step of SMC, AutoProjectStartup, the configuration in the EMs section is:
    <EM Name="SMC">
    <PostInstallationSteps>
    <Step Name="AutoProjectStartup" Execute="True"/>
    </PostInstallationSteps>
    </EM>
  • The post-installation steps are available at a known path configured in the [GMS/EM]PostInstallationConfig.xml file. This file is available at the path
    …\InstallFiles\[GMS/EM]\[EMName]\PostInstallation. During installation of the platform or the extension, the PostInstallation folder is copied to ..\GMSMainProject and the post-installation steps are executed from ..\GMSMainProject\PostInstallation\GMS or ..\GMSMainProject\PostInstallation\EM\[EM Name].
  • (Applicable only for the post-installation step of License Activation) The post-installation step of License Activation is configured and available at the path
    …\InstallFiles\GMS\PostInstallation. During platform installation, the PostInstallation folder is copied to ..\GMSMainProject and the post-installation steps are executed from ..\GMSMainProject\PostInstallation\GMS\LicenseActivation.
    Also, the license file (.lic) file or ActivationID.txt/EntitlementID.txt file containing the IDs is available at the configured license path: [Installation Drive:\GMS\Licenses].
  • (Applicable only for the post-installation step of Project Setup) The post-installation step of Project Setup is configured and available at the path
    …\InstallFiles\EM\SMC\PostInstallation. During the installation of SMC, the PostInstallation folder is copied to ..\GMSMainProject and the post-installation step is executed from ..\GMSMainProject\PostInstallation\EM\SMC.
    You have reviewed the considerations, verified the project backup is available at the configured backup path: [Installation Drive:\GMS\Backups].
  • (Applicable only for the post-installation step of other supported extensions): The post-installation steps, of extension, if available, is available at the path
    …\InstallFiles\EM\[EMName]\PostInstallation is configured, verified. During installation of the extension, the PostInstallation folder is copied to ..\GMSMainProject and the post-installation step is executed from ..\GMSMainProject\PostInstallation\EM\[EM Name].
    For considerations for post-installation steps of extensions, see the extension post-installation sections.
  1. Modify the [GMS/EM]PostInstallationConfig.txt file by changing the extension from .txt to .xml for each post-installation step that you to be executed.
  • The [GMS/EM]PostInstallationConfig.xml file is enabled for execution.
  1. Install the Setup type - Server using the custom, semi-automatic, silent installation mode.
  • Depending on the installation mode, and the Execute tag values in GMS Platform.xml file and the [GMS/EM]PostInstallationConfig.xml file, the PostInstallation Selection dialog box may or may not display listing the configured post-installation steps.
  • After the successful installation the configured post-installation steps are executed successfully and the logon dialog box displays.
  1. In the Desigo CC Client application logon dialog box, after entering the current user name and password for the very first login, you are prompted to change the password.
    You also need to configure the root user password, once you login, using Users application.

Overview of Post-Installation Steps

To simplify some routine tasks performed by the commissioning engineer, related to license activation, project engineering and some extended feature task supported by some extensions, the Installer can be configured to refer to a pre-configured post-installation file, which when executed as a part of installation process, performs these tasks according to the parameters configured in the post-installation configuration file.


The post-installation step configured in the [GMS/EM]PostInstallationConfig.xml file may refer to a post-installation [PostInstallationStepName].json file, which provides some additional parameters along with their values to the post-installation step file for execution.

  • [GMS/EM]PostInstallationConfig.xml file allows to enable the execution of the step and specify in which way execution will take place.
  • [PostInstallationStepName].json file allows to configure the parameters related to a specific step. There are post-installation steps where no configuration file is required.

NOTE:
The modification of [GMS/EM]PostInstallationConfig.xml or is [PostInstallationStepName].json file typically done by librarian / distribution manager. Occasionally a Commissioning Engineer can also edit the .json configuration file.
For information on how to configure the [GMS/EM]PostInstallationConfig.xml or is [PostInstallationStepName].json file, see Librarian and Distribution document. (A6V11643840)

You can run the post-installation step as a part GMS/EM during the process of new installation or as part of management station upgrade, or as a part of only extension upgrade, or as a part of new extension installation with the same version as that of the installed management station. Furthermore, during the new installation if the post-installation step fails and the value of the attribute RetryOnFail is set to True, you can re-run the failed post-installation step by running the setup exe.

During custom/semi-automatic installation, all the enabled post-installation steps of management platform (GMS) and/or extension (EM), display as selected for execution in the Post-Installation Selection dialog box and get executed.

In case of semi-automatic or silent installation, a preconfigured GMS Platform.xml file, containing the post-installation steps of management platform (GMS) and/or extension (EM) are referred to.

The post-installation steps, when executed, simplifies the routing configuration tasks. Thus helping in reducing the commissioning time. Configuring the post-installation steps for the extensions also reduce the time spent setting up the system with these extended feature of Desigo CC .

Since the installation and post-installation takes care of the installation along with project engineering tasks, you are ready to log into the Desigo CC Client application and start directly with the engineering tasks.

Supported Post-Installation Steps on the Setup Type - Server

  • License activation (GMS)
  • Project restore and upgrade (mandatory extension SMC)
  • HDB creation (mandatory extension SMC)
  • LTS creation (mandatory extension SMC)
  • Linking HDB to project (mandatory extension SMC)
  • Website creation (mandatory extension SMC)
  • Web application creation (mandatory extension SMC)
  • Project activation and startup (mandatory extension SMC)
  • Client application startup (mandatory extension SMC)

Additional supported post-installation steps of some extensions on the setup type – Server, Client/FEP include:

  • AddSWInstallation
  • TemplateSynchronization
  • Extension web application creation, if configured for an extension

Common Considerations for Post-Installation Steps

You must verify the following considerations before executing the post-installation steps using custom, Semi-automatic or silent installation:

  • New or existing Desigo CC, standalone Server system with any of the Desigo CC supported Windows OS installed.
  • No changes must be done in the registry after the Windows installation.
  • WindowsErrorReporting must be disabled on your machine. You can check the status of WindowsErrorReporting by running the powershell Get-WindowsErrorReporting command in the command prompt opened using administrative privileges. This command returns the status as Enabled or Disabled.
    • To disable WindowsErrorReporting, run the powershell Disable-WindowsErrorReporting command. This command returns True, if the operation is successful and False in case of failure.
    • To enable WindowsErrorReporting after completion of post-installation steps, run the powershell Enable-WindowsErrorReporting command.
  • No prerequisite of Desigo CC including the SQL Server is installed on the computer where you are going to execute the post-installation steps. This is applicable for the tag Precondition = Fresh_Machine.
  • The extension for which the post-installation steps are to be executed is consistent and available in the distribution media. A mandatory extension and its parent extension (mandatory/non-mandatory) is always installed and added to the project during installation/upgrade of the management platform itself or the project.
  • The post-installation steps are available at a known path configured in the [GMS/EM]PostInstallationConfig.txt file. The [GMS/EM]PostInstallationConfig.txt file is available at the path
    …\InstallFiles\EM\[EMName]\PostInstallation.
    During installation of the platform or extension, the PostInstallation folder is copied to ..\GMSMainProject and the post-installation steps are executed from ..\GMSMainProject\PostInstallation\GMS or ..\GMSMainProject\PostInstallation\EM\[EM Name].
  • Only the valid, enabled (changed extension from .txt to .xml) and selected post-installation steps are executed during the installation.
  • The <PostInstallationSteps> section of the GMSPlatform.xml file must be configured for the post-installation step for which Execute = AskUser tag value is configured in the [GMS/EM]PostInstallationConfig.xml file.
  • For example, for the post-installation step of SMC, AutoProjectStartup, the configuration in the EMs section is:
    <EM Name="SMC">
    <PostInstallationSteps>
    <Step Name="AutoProjectStartup" Execute="True"/>
    </PostInstallationSteps>
    </EM>
  • (Applicable only for custom installation) Only those post-installation steps for which Execute = AskUser is configured in the [GMS/EMPostInstallationConfig.txt] are displayed as selected in the PostInstallation Steps Selection dialog box. For the attribute value Execute = Always configured in the [GMS/EMPostInstallationConfig.txt] file, the steps are directly listed in the Ready to Install the Program dialog box.
  • (Applicable only for semi-automatic installation) Only those post-installation steps for which Execute = AskUser is configured in the [GMS/EMPostInstallationConfig.txt] and Execute = True configured in the <PostInstallationSteps> section of GMS Platform.xml file are displayed in the PostInstallation Steps Selection dialog box. The post-installation steps that have the value Execute = Always configured in the [GMS/EMPostInstallationConfig.txt] is directly listed in the Ready to Install the Program dialog box for execution. In case of semi-automatic installation, the PostInstallation Steps Selection dialog box displays only when there is any inconsistency in the [GMS/EM]PostInstallationConfig.xml file, for example if the mandatory tags such as Command is empty or missing and the Step Name is configured in the GMSPlatform.xml file.
  • (Applicable only for silent Installation) Only those post-installation steps having Execute = AskUser in the [GMS/EMPostInstallationConfig.txt] and Execute = True configured in the <PostInstallationSteps> section of GMS Platform.xml file or having Execute = Always configured in the [GMS/EMPostInstallationConfig.txt] are considered for execution during post-installation step execution using silent installation.
  • (Applicable only when upgrading the management station or an extension, language pack or a prerequisite), Only those post-installation steps having the following parameters are considered during the upgrade:
    • Only those post-installation steps that have the value for the attribute PreConditions = “None” or PreConditions = “” and for the attribute InvolvedInUpgradeWorkflow = AskUser/Always configured in the [GMS/EMName]PostInstallationConfig.xml file are considered for the execution of post-installation steps of the platform or extension which is upgradable.
    • If the tag value is PreConditions = “Fresh_Machine”, then a warning message displays in the Welcome to the Upgrade Wizard dialog box and the post-installation step is not listed in the PostInstallation Step Selection dialog box and not executed.
    • (Only for custom and semi-automatic upgrade) The post-installation steps that have the attribute value InvolvedInUpgradeWorkflow = AskUser are displayed in the PostInstallation Steps Selection dialog box whereas, the post-installation steps that have the attribute value InvolvedInUpgradeWorkflow = Always are directly listed in the Ready to Install the Program dialog box. In semi-automatic upgrade the PostInstallation Steps Selection dialog box displays only when any inconsistency is mentioned in the post-installation step present in the GMS Platform.xml file.
  • (Applicable only for the execution of post-installation steps of the new extensions to be installed during the management station upgrade or extension using the Update icon.)
    • Only those post-installation steps that have the value for the attribute PreConditions = “gNone” or PreConditions = “” and for the attribute Execute = “AskUser/Always” configured in the [GMS/EMName]PostInstallationConfig.xml file are considered for the execution of post-installation steps.
    • If the tag value is PreConditions = “Fresh_Machine”, then the post-installation step is ignored.
    • The post-installation steps that have the attribute value Execute = “AskUser” are displayed in the PostInstallation Steps Selection dialog box whereas, the post-installation steps that have the attribute value Execute = “Always“ are directly listed in the Ready to Install the Program dialog box.
  • For an extension, whose post-installation steps have failed during the installation, and are applicable for extension upgrade, then during the extension upgrade process the previously failed post-installation steps are completely ignored and the new post-installation steps are considered for execution. If no post-installation steps are available with the upgradable extension, then no post-installation steps are executed.
  • (Applicable for post-installation steps that are configured as RetryOnFailed = Yes) If the post-installation step is failed during its execution then during the re-run the failed post-installation steps are considered for re-execution. For the failed post-installation step of an extension, you can execute the failed post-installation steps using the Update icon or by manually running the Setup.exe. For the post-installation step of License Activation (management platform), you can only re-run it using the Setup.exe.


Execution of Post-Installation Steps Based on the Execute Tag Value

The following table shows all the combinations of post-installation step configured for Execute tag:

Value of Execute tag in the
[GMS/EM]PostInstallationConfig.xml
File

Value of Execute tag in the GMSPlatform.xml File

Result During Installation Process

AskUser

True

Semi-automatic Installation: The step is considered for execution and displays in the Ready to Install the Program dialog box.

Silent Installation: The step is considered for execution and displays in the toolbar notification area during the step execution.

AskUser

False

Semi-automatic: The step is excluded from the execution and does not display in the Ready to Install the Program dialog box.

Silent installation: The step is excluded from the execution.

Always

True

Semi-automatic Installation: The step is considered for execution and displays in the Ready to Install the Program dialog box.

Silent installation: The step is considered for execution and displays in the toolbar notification area during the step execution.

Always

False

Semi-automatic Installation: The step is considered for execution and displays in the Ready to Install the Program dialog box.

Silent Installation: The step is considered for execution and displays in the toolbar notification area during the step execution.

Post-Installation Step of License Activation (GMS)

The post-installation step of LicenseActivation is next logical step be executed after the installation of the Desigo CC Server.

It supports the activation of .lic dongle certificate files for dongle-based licenses and Activation IDs/Entitlement IDs for trusted store licenses.


Considerations for Post-Installation Step: License Activation

  • The post-installation step of License Activation is configured and available at the path
    …\InstallFiles\GMS\PostInstallation. During Platform installation, the PostInstallation folder is copied to ..\GMSMainProject and the post-installation step of license activation is executed from ..\GMSMainProject\PostInstallation\GMS\LicenseActivation.
    • The dongle certificate license file (.lic file) for activating the license is available at the configured LicensePath: [Installation Drive:\GMS\Licenses].
      For more information on how to generate the dongle certificate (.lic file), refer to the LMU help topic Dongle certificate return. Do not forget to plug in the corresponding dongle to the Desigo CC Server computer after .lic file activation to work with Desigo CC Client in Normal/Engineering license mode.
    • You must have the EntitlementID.txt file for activating one or more licenses included in the entitlement at once or ActivationID.txt for activating the specific licenses separately is available at the configured LicensePath: [Installation Drive:\GMS\Licenses].
  • This step must be configured in the GMSPostInstallationConfig.xml file for post-installation step execution using custom, semi-automatic or silent installation.
  • Additionally, for semi-automatic and silent installation, you must configure the License Activation step in the <PostInstallationSteps> section of the <GMS> section in the GMS Platform.xml file.
  • As a next step, you need to enable the License Activation step by changing the extension from .txt to .xml for the GMSPostInstallationConfig.txt file.
  • Once enabled, it allows you to activate one or more licenses without using the LMU (License Management Utility).


Post-Installation Step of Project Setup (SMC)

The post-installation step of AutoProjectStartup is the next logical step after the License Activation.

This step must be configured in the SMCPostInstallationConfig.xml file located at the path
…\InstallFiles\EM\SMC\PostInstallation for custom, semi or silent installation. During installation of SMC, the PostInstallation folder is copied to ..\GMSMainProject and the post-installation step of project setup is executed from ..\GMSMainProject\PostInstallation\EM\SMC. Additionally, for semi-automatic and silent installation, you must configure this the PostInstallationSteps section in the GMS Platform.xml file.

When configured and enabled (modified the extension from (txt to .xml) it enables the automatic project startup. During the execution of this step, the Installer restores a project template or a project backup from the specified backup path, upgrades a project if required. It also creates an empty History Database with or without Long Term Storage and links the HDB to the project, activates and starts the project. It also creates a new website/web application user (local user who is a member of the IIS_IUSRS group) and a default self-signed certificate that is used to secure the communication between the Windows App client and the Web (IIS) Sever. After the successful web application creation, it provides the web application URL that you can use for launching the Windows App client.

Once this post-installation step is executed, the logon dialog box displays for specifying the user credentials.


Considerations for Post-Installation Step: Project Setup

  • Major version of Windows PowerShell > = 5.1
    Verify the Windows PowerShell version before proceeding with the automatic project startup. If it is < 5.1, you must install the latest Windows updates, which in turn update the Windows PowerShell version.
    Alternatively, you can download the latest updates for Windows Management Framework that in turn internally updates the Windows PowerShell version.
    For more information, see Verifying and Updating the Windows Management Framework 5.1.
  • The project backup is available at the backup path specified in the AutomaticProjectConfiguration.json file [$InstallDrive\\GMS\\Backups\\]
    For example, $InstallDrive\\GMS\\Backups\\ServerProject1
  • For creating LTS, the value of the attribute CreateArchives is set to True.
  • In order to provide the user credentials on the logon dialog box that displays after the Project Setup completion, you have acquired the user credentials for the project backup/template you want to restore using the post-installation step – Project Setup.
  • Applicable only for the WebsiteConfiguration:
    • You must have IIS installed on the Server computer.
    • You have removed the Default IIS Website in IIS Manager.
    • The project with which you are linking the web application must have the Web Communication (CCom port) as either Secured or Local. If the Web Server Communication is Disabled, the Windows App Client does not work.
      In this case using SMC, you must manually edit the project and change the Web Server Communication to either Secured or Local and then align the Web application before launching the web application URL.
    • The website user configured in the AutomaticProjectConfiguration.json file for Project Setup is created, if not already present. There is only a password prompt for existing, already configured website users (local/domain).
  • (Applicable only for the management station in-place upgrade or the upgrade of SMC extension) In the AutomaticProjectConfiguration.json file, you have configured the following attribute values:
    • ProjectName: The name of the existing project that you want to upgrade.
      For example, if the name of the existing Project is CustomerProject1, then the value of the attribute must be configured as "ProjectName" : "CustomerProject1".
    • ProjectPath: The path where the existing project is created.
      For example, if the existing project is located at the path [Installation Drive]:\[ Installation Folder], then the same path must be configured. If you provide a different path, an error message displays mentioning that the configured project is not available at the configured path.
    • DatabaseName: The name of the existing HDB that you want to upgrade.
    • WebsiteName: The name of the existing website that you want to upgrade.
    • WebApplicationName: The name of the existing application that you want to upgrade.
      The post-installation step for the website/web application user whose password has changed or expired gets failed.


Choose the Installation Mode

Before proceeding with the installation of any setup type (Server/Client/FEP), you must decide on one of the following installation modes in which the installation program can run.

  • Custom (Run the Gms.InstallerSetup.exe file located in the InstallFiles folder and provide the required information in the Installer Wizard).
  • Semi-automatic (Use the pre-configured the GMS Platform.xml file located at the path ...\InstallFiles\Instructions, then run the Gms.InstallerSetup.exe and thus interact minimally with the Installer Wizard user interface).
  • Silent (Use the pre-configured GMS Platform.xml file located at the path ...\InstallFiles\Instructions, then run the Gms.InstallerSetup.exe file using the command prompt, and run the setup silently with no Installer Wizard user interface displayed. During the silent installation, the Installer provides the installation status using the taskbar notification area icon.)

Custom Installation

Custom installation is performed using the Installer Wizard. You can make choices such as accepting or declining the SQL Server 2019 installation, specifying preferences such as the installation location, and so on. In case of any errors, the user can mitigate the errors. For instance, if the disk where Desigo CC is being installed is full, the installer may ask the user to specify another target path or clear enough space in the disk.

Use the custom installation to:

  • Install all the three setup types — Server, Client and FEP.
  • Execute the post-installation steps of platform or an extension.
  • Upgrade the management station, extensions along with the post-installation steps.

Semi-Automatic Installation

The semi-automatic installation provides you the mix of both installation modes – the custom installation and the silent installation.

As in silent installation, the semi-automatic installation uses the XML file (GMS Platform.xml) having the pre-configured parameters for installation.

As in custom installation mode, you must run the Setup.exe file and launch the Installer Wizard and select the sample XML file (GMS Platform.xml) available at the path …\InstallFiles\Instructions. Alternatively, you can create an XML file with all the required pre-configured settings for installation.

The Installer then performs the installation by skipping the corresponding dialog box according to the pre-configured parameters (for example, languages, extensions); thus reducing the interaction with the field engineer to the minimum.

The Installer Wizard, however, may also display, overriding the pre-configured parameters, to assist you in correcting the provided parameters. For example, if the installation drive specified in the default Installation Path does not have enough disk space, the Installer displays the Installation Folder dialog box; thus allowing you to correct the path, for example, by selecting a different drive on the disk.

You can use the semi-automatic installation to execute the post-installation steps of platform or an extension.

NOTE:
Upgrade of management station or an extension using silent or semi-automatic installation mode is not supported in the current version!


Silent Installation

Silent installation is an installation that is performed without user interaction or user presence during its progress.

A silent installation is especially useful when you want to install a setup type (for example, Server) on many computers at the same time. This is also useful when you want to duplicate the installation options such as the extensions or the Language Packs on many computers.

Silent installation allows you to set the installation configurations only once and then use those configurations to duplicate the installation on many computers. The installations to be done on multiple systems for example, for setting up the distributed systems can be performed using the silent installation, thus helping the field engineer to perform the unattended installation.

During silent installation, the Installer reads the settings from an XML file (GMS Platform.xml) that you created prior to beginning the installation. The Installer runs the setup silently with no GUI displayed and provides the installation status using the taskbar notification area icon.

Since the silent installation is unattended, it is assumed that there is no user to help mitigate errors. For instance, if the disk where the Desigo CC is being installed is full, or the installer fails the installation, no one is available to specify another target path or clear enough space in the disk.

You can use the silent installation to execute the post-installation steps of platform or an extension.

NOTE:
Though the silent installation performs the installation in the background and you can setup the computer to restart automatically before or after the installation of any prerequisite, you need to provide the Windows login details, after the computer restarts, so as to proceed with the silent installation.


Determine the Installation Setup Type

The Installer allows to set up the following components:

Setup Type – Server

The Desigo CC Server is the basis of all deployment types. Thus, it is recommended to first install the setup type – Server before installing the other setup types.

The Server installation can additionally include a local history database server (Microsoft SQL database software). Optionally the history database server can be located on a remote computer as a remote history database server.

The Server with a history database server can be configured as a Stand-alone system deployment type. Once the system administration tasks are done using SMC, you can launch the Desigo CC Client application and work as a Stand-alone system.

When the Web server (IIS) is installed locally on the same Server computer, it is a local Web server. Once you configure the websites/web applications using SMC, you can work as a Stand-alone system with a local web server (IIS) system deployment type by launching Windows App Clients.

Setup Type – Client and FEP

Once you have installed Desigo CC Server, you can proceed with the installation of the setup type - Client or FEP and work as a Client/Server system deployment type.

You must install the Client or FEP on a separate computer, other than Server computer. The Client or FEP does not have a database and cannot work without a Server.

The Client/FEP installation always includes installation of a Client application (user interface), the System Management Console (SMC), and all prerequisites applicable for the Client or FEP installation.

Additionally, the features (extensions), available for selection, are also tailored according to the selected Setup type - Client or FEP.

The Setup type - FEP is an extension to the Desigo CC Server to provide additional resources to connect subsystems.

The Setup type - Client is designed for mission-critical applications, such as fire safety monitoring or critical process control, where users are focused entirely on monitoring and managing building systems.

You can install also Web server (IIS) on the Setup type – Client or FEP and work as a Server with remote web server (IIS) system deployment type.

Once the installation is completed, on all the three Setup types, a tool called System Management Console, SMC and the Desigo CC Client application is installed.

Using SMC, you must perform some system administration tasks such as project, history database, system users configuration before launching the Desigo CC Client application.

On all three Setup types – Server, Client and FEP, you can configure a Web server by installing the IIS and work with the Windows App/Flex Clients.


(Optional) Verify QualityUpdates Folder
  • Quality Update is a group of multiple patches for extensions, platform, and language packs. Quality Update releases happen over a certain time period.
  • To install quality updates, the QualityUpdates folder is present in the Installation media at ...\InstallerDVD\InstallFiles in parallel to the GmsInstallerSetup.exe file.
  • All the patches must be arranged within the QualityUpdates folder.
  • The QualityUpdatesConfig.xml file must be present in the QualityUpdates folder.
  • If a same prerequisite of Platform or extension is present in the M300 package as well as the QualityUpdates folder, then Installer gives priority to the prerequisite from the QualityUpdates folder.
  • You can have both the Quality Updates and Hotfixes folder in the Installation media at ...\InstallerDVD\InstallFiles in parallel to the GmsInstallerSetup.exe file. This enables the Installer to select the latest patch for the extension or Platform from Quality Updates or Hotfixes folder during installation.
(Optional) Verify Hotfixes Folder
  • Hotfixes are a group of patches for extensions, platform, and language packs that need to be delivered as a quick fix for critical defects.
  • To install Hotfixes, the Hotfixes folder is present in the Installation media at ...\InstallerDVD\InstallFiles in parallel to the GmsInstallerSetup.exe file.
  • The [EM]PatchConfig.xml file for the patch to be installed must have the UpdateLabel attribute. For Platform patches, the GMSPatchConfig.xml file is used.
  • If a same prerequisite of Platform or extension is present in the M300 package as well as the Hotfixes folder, then Installer gives priority to the prerequisite from the Hotfixes folder.
  • You can have both the Quality Updates and Hotfixes folder in the Installation media at ...\InstallerDVD\InstallFiles in parallel to the GmsInstallerSetup.exe file. This enables the Installer to select the latest patch for the extension or Platform from Quality Updates or Hotfixes folder during installation.